The steps 1 to 12 of this NSX-T Installation series focused on the setup of the NSX-T Datacenter components i.e. NSX-T Management Cluster, Host and Edge Transport Nodes. From, Step 13 onwards, the focus shifted to building logical network topology that I alluded to in Step 0 – High Level Design.
Links to all the steps of the Second Phase for quick jump:
- Step 13 – Create T1 (Tier-1) Gateway
- Step 14 – Create Overlay Segments
- Step 15 (Option 1) – Migrate VM(s) from vDS to N-VDS – this blog
- Step 15 (Option 2) – Bulk VM Migration from vDS to N-VDS
- Step 16 – Create VLAN Segments
- Step 17 – Create T0 (Tier-0) Gateway [active-active] and configure BGP
- Step 18 – T0 (Tier-0) Gateway: Map BGP Neighbor to specific Uplink Interface
- Step 19 – Connect T1 (Tier-1) Gateway to T0 (Tier-0) Gateway
- Step 20 – Configure Route Distribution on T0 (Tier-0) Gateway
The previous step, discussed Overlay Segments and step-by-step instructions on how to configure one. This blog is part of the Second Phase i.e. building the logical network topology and “Step 15 (Option 1)” of the NSX-T Installation series, in which we will discuss step-by-step instructions on how to migrate VM(s) from vDS to N-VDS.
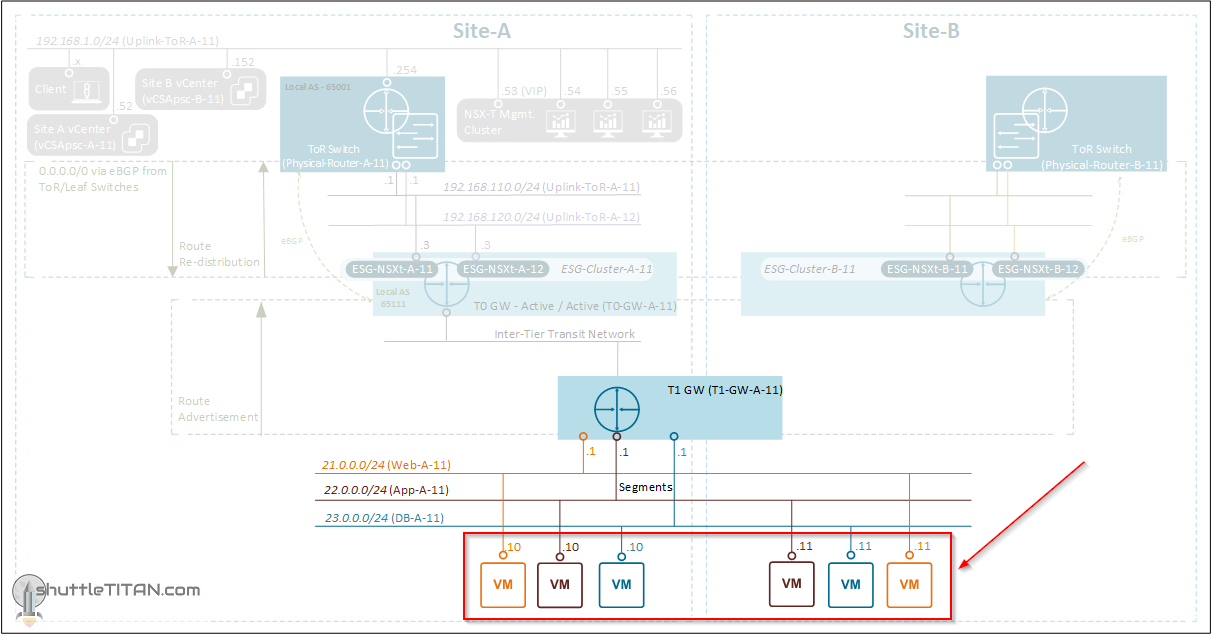
The image below highlights the logical entity of the “Routing Design” this step focuses on:
This step is more of a “Quick Tip” short blog, which you may already be familiar with but hey, aren’t we doing a step-by-step of the NSX-T Installation series ?😊
——————————————————————————————————————————————————
Before we proceed, I would encourage you to briefly skim through my other blogs below, which you may find useful for this step:
- NSX-T Architecture (Revamped)for v2.4 and later
- Series Overview: Step 0 – High Level Design
- Preceding Step (Pre-requisites): Step 14 – Create Overlay Segments
It is assumed that you have NSX-T Management Cluster deployed, Host and Edge Transport Nodes configured and ready to use. If not, please refer the steps 1 to 12 in this NSX-T Installation series for guidance.
If you are deploying this in your home lab or performing a PoC in a nested vSphere Environment, I would also suggest you have a quick glance of my blog Home Lab Setup – Nested ESXi Host’s networking for NSX-T.
——————————————————————————————————————————————————–
There are many ways to migrate a VM from vDS to N-VDS, I will discuss two options as below:
- Step 15 (Option 1) – Migrate VM(s) from vDS to N-VDS – this blog
- Step 15 (Option 2) – Bulk VM Migration from vDS to N-VDS
With that lets get started…
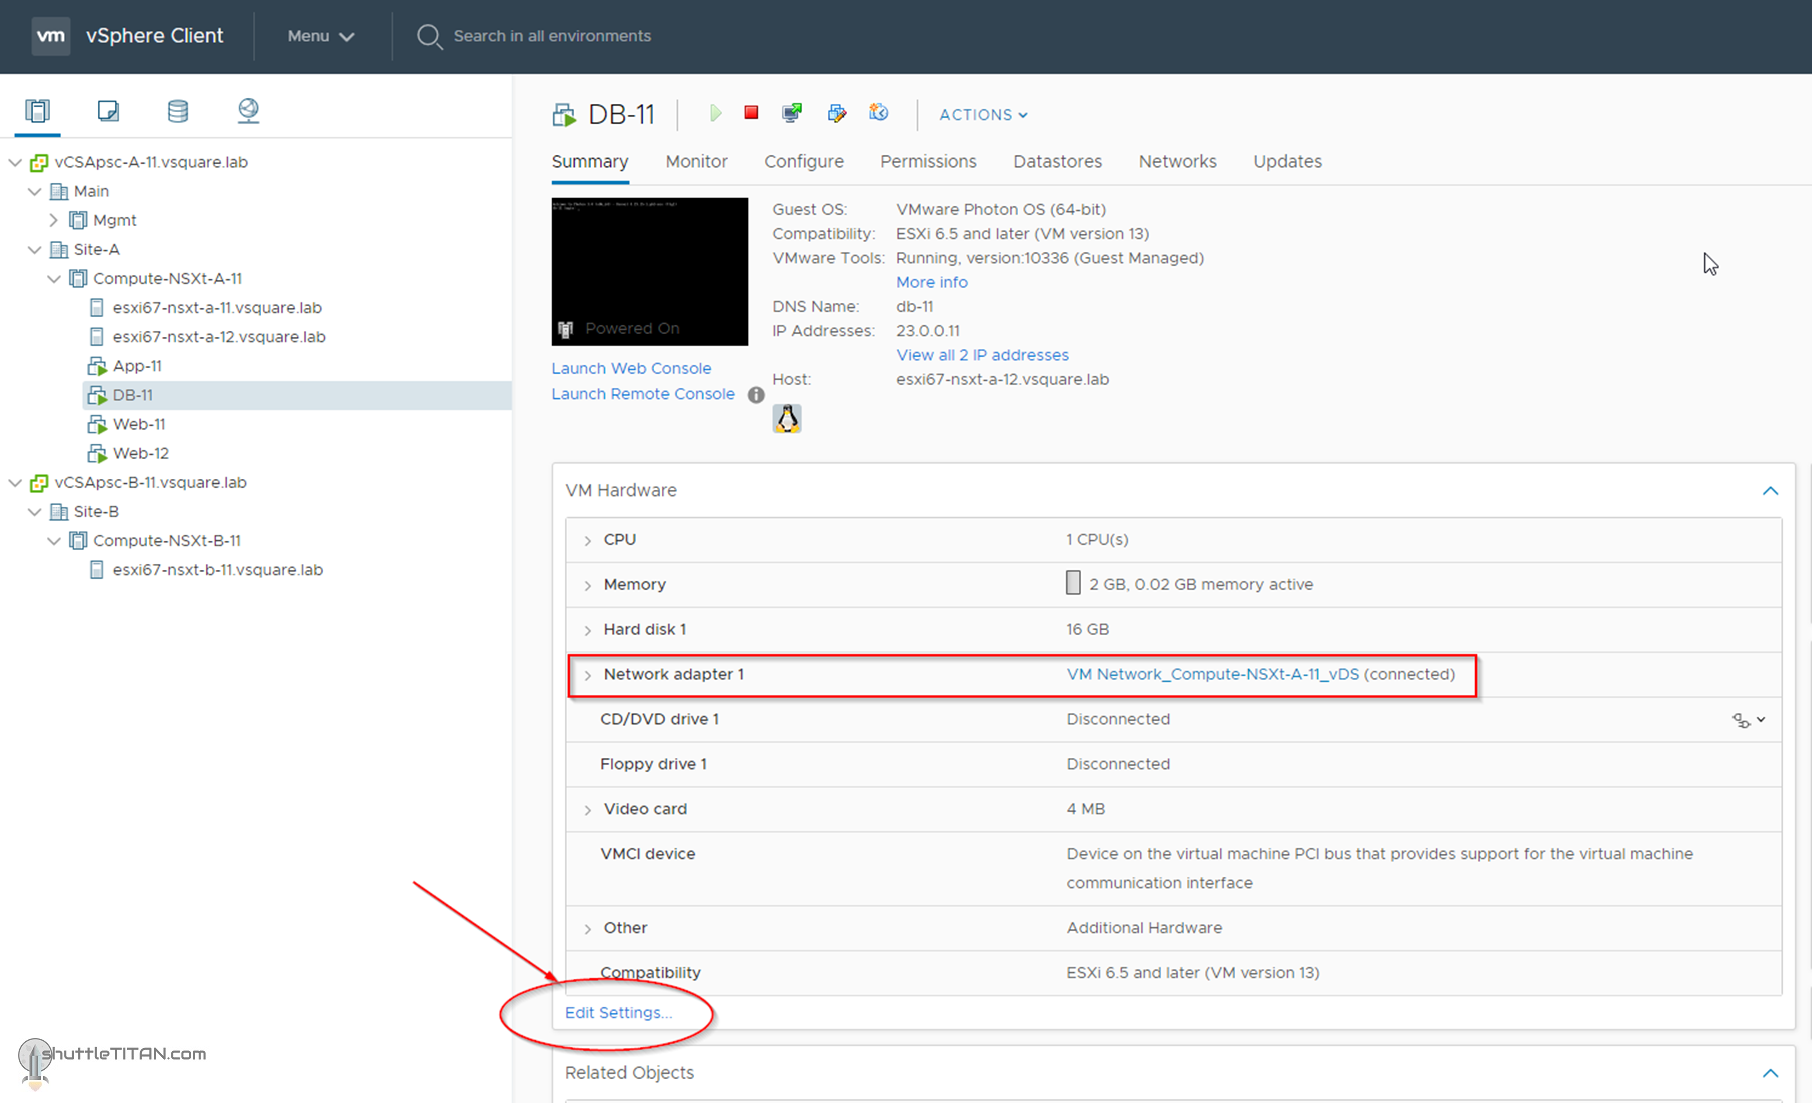
1. Logon to vCenter and Edit the Settings of the VM you would like to migrate, in my case its “DB-11”:
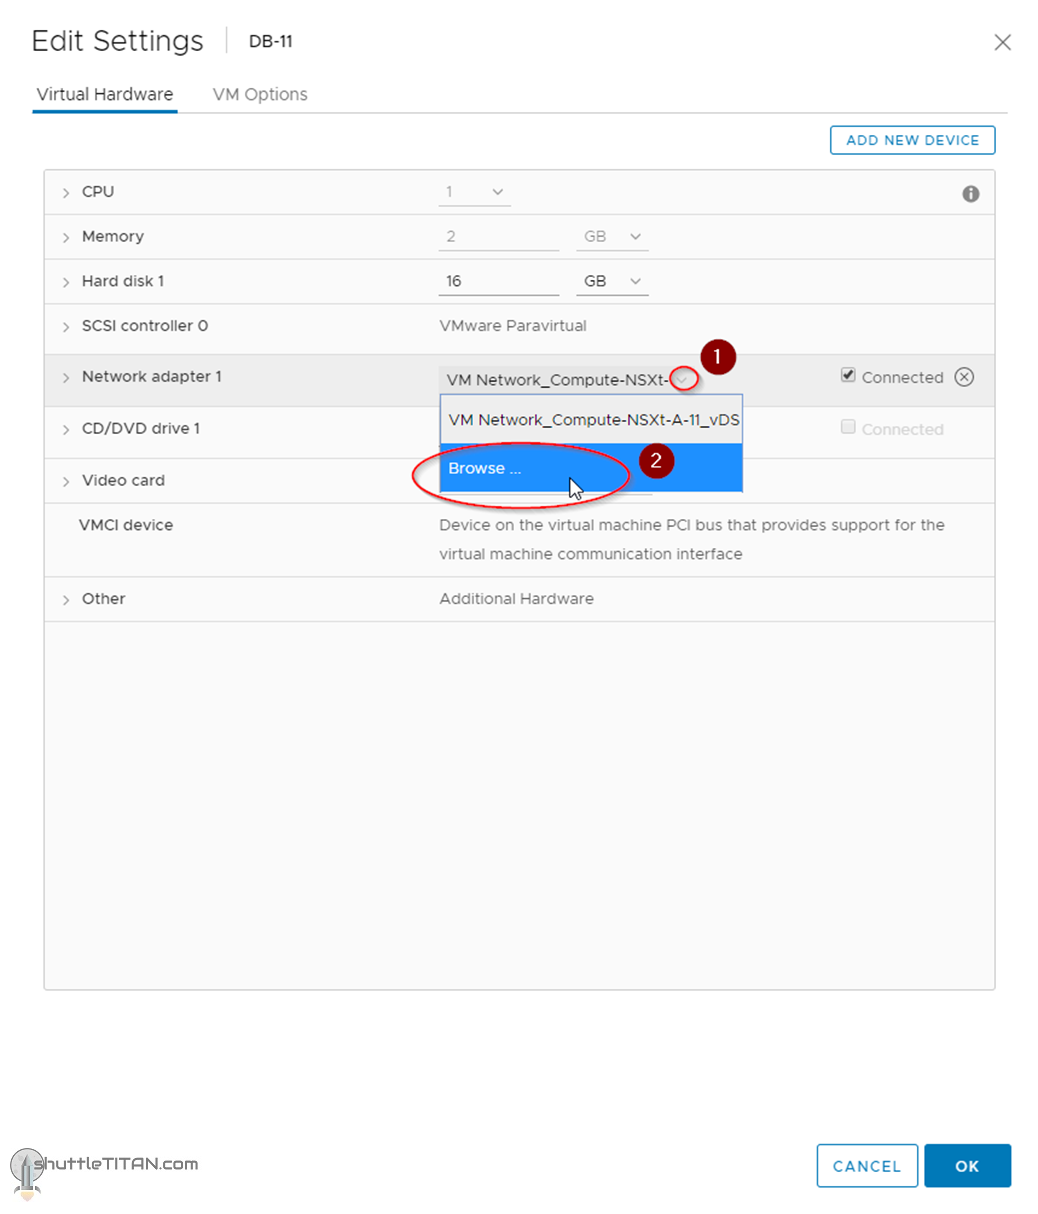
2. Click Network adapter -> “Browse…”:
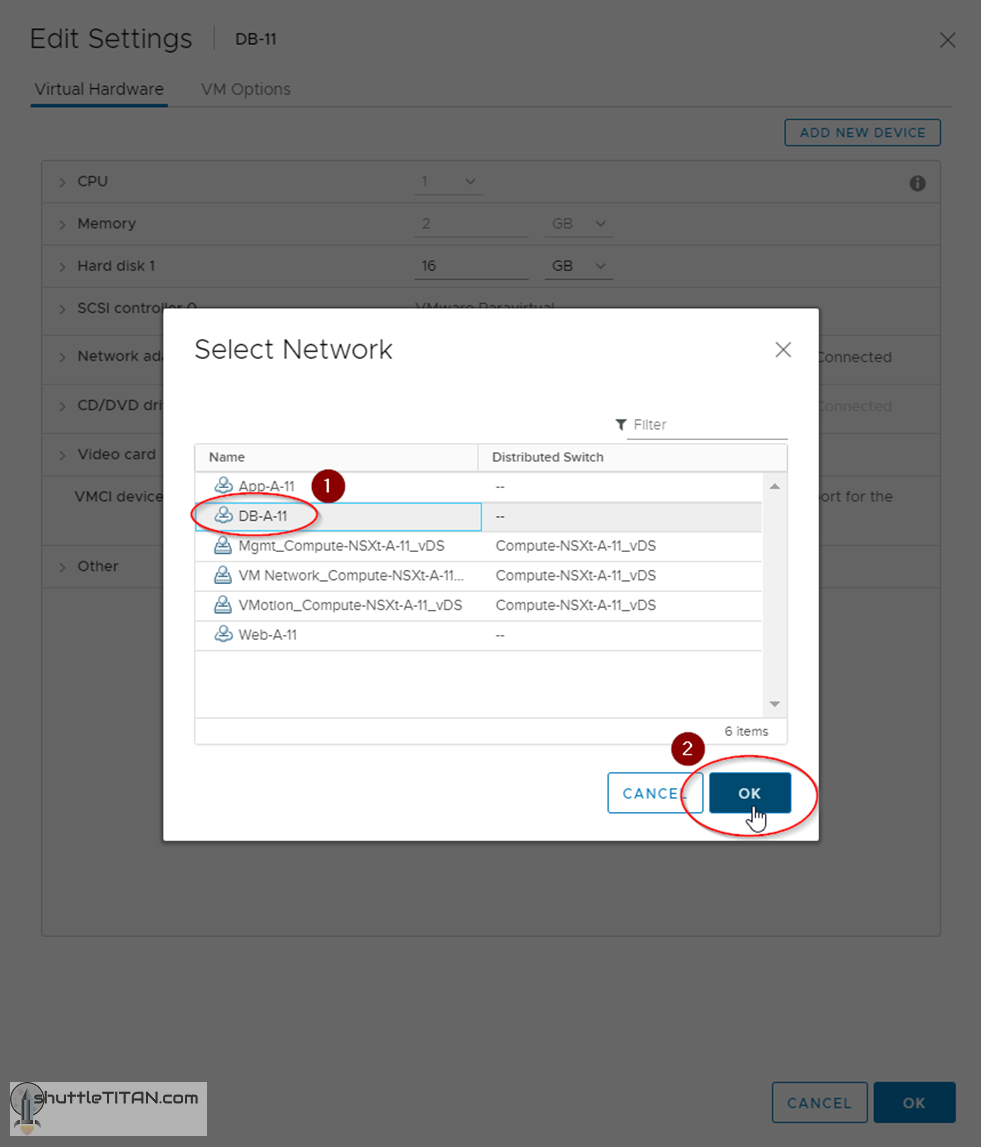
3. Click “DB-A-11” (created in the previous step) and click OK:
4. Click “OK” again:

Follow the same steps, for the remaining VMs you may have in your environment e.g. Web-11, Web-12, App-11 or if you want to do a bulk VM migration see Step 15 (Option 2) – Bulk VM Migration from vDS to N-VDS.
(Optional) You could also start a continuous ping, to validate the connectivity between VMs before and after migration. In my case App-11 VM was already on N-VDS and Web-11 and Web-12 were on vDS, so I started a ping from:
- Web-11 to Web-12
- Web-12 to App-11
- App-11 to Web-11

Note: Above is not a “availability” test to prove if the VM loses connectivity during migration. It is to validate the East-West communication between the 3-tier VMs running, confirming the routing is working on T1-GW-A-11 (configured in Step -13).
- Web-11 to Web-12: No ping loss
- Web-12 to App-11: Pings start working after successful migration
- App-11 to Web-11: Pings start working after successful migration
As mentioned before, till now we have only setup East-West communication. For North-South communication, we will need a Tier-0 Gateway which is discussed and created in Step 17 – Create T0 (Tier-0) Gateway [active-active] and Configure BGP.
This concludes this step of moving VM(s) from vDS to N-VDS successfully.
Let’s proceed ahead with the next blog in this series Step 16 – Create VLAN Segments.