The previous step, discussed Transport Node Profiles, its considerations and step-by-step instructions on how to create one. This blog is the “Step 9” of the NSX-T Installation series, where we will discuss Host Transport Nodes, step-by-step instructions on how to configure ESXi Hosts as Host Transport Node, TEP IP Identification and basic connectivity validation.
—————————————————————————————————————————————————————
But before we proceed, I would encourage you to briefly skim through my other blogs below, which you may find useful for this step:
- NSX-T Architecture (Revamped)for v2.4 and later
- Series Overview: Step 0 – High Level Design
- Preceding Steps (Pre-requisites):
If you are deploying this in your home lab or performing a PoC in a nested vSphere Environment, I would also suggest you have a quick glance of my blog Home Lab Setup – Nested ESXi Host’s networking for NSX-T.
——————————————————————————————————————————————————————
When a hypervisor host is prepared to function with NSX-T Data Center, the host is known as “Fabric Node” which carries the overlay traffic. All fabric nodes have NSX-T Data Center modules installed and are registered with the NSX-T Data Center management plane.
For a hypervisor host or a bare metal server to be part of the NSX-T Data Center overlay, it must first be added to the NSX-T Data Center fabric.
There are two methods of preparing the host for NSX-T Datacenter:
- Command Line (Manual):
- Install Kernel Modules on hypervisors – ESXi, KVM (Ubuntu, RHEL and CentOS)
- Join hypervisor hosts to Management Plane
- Via NSX Manager UI (Automated):
Both the manual installation steps i.e. installation of kernel modules and joining the host to the management plane are automatically performed using this method.
Note:
- Bare-Metal Servers can only be added as fabric nodes via NSX Manager UI and NSX-T Datacenter kernel mode modules cannot be installed on them manually via command line.
- NSX-T Datacenter kernel mode modules can also be packaged with ESXi Image for bulk deployments.
- On vSphere ESXi, the modules are packaged as VIBs. for KVM or bare metal server on RHEL/CentOS and Ubuntu, they are packaged as RPMs and DEBs respectively.
For Non ESXi Hosts, there are a couple of pre-requisites:
- Third-Party Packages installation on a KVM Host or Bare Metal Server.
- Openvswitch version 2.9.1.8614397-1 on RHEL KVM Hosts.
For this series, we will be focusing on configuring ESXi Hosts as Host Transport Nodes via NSX-T manager UI.
Let’s get started…
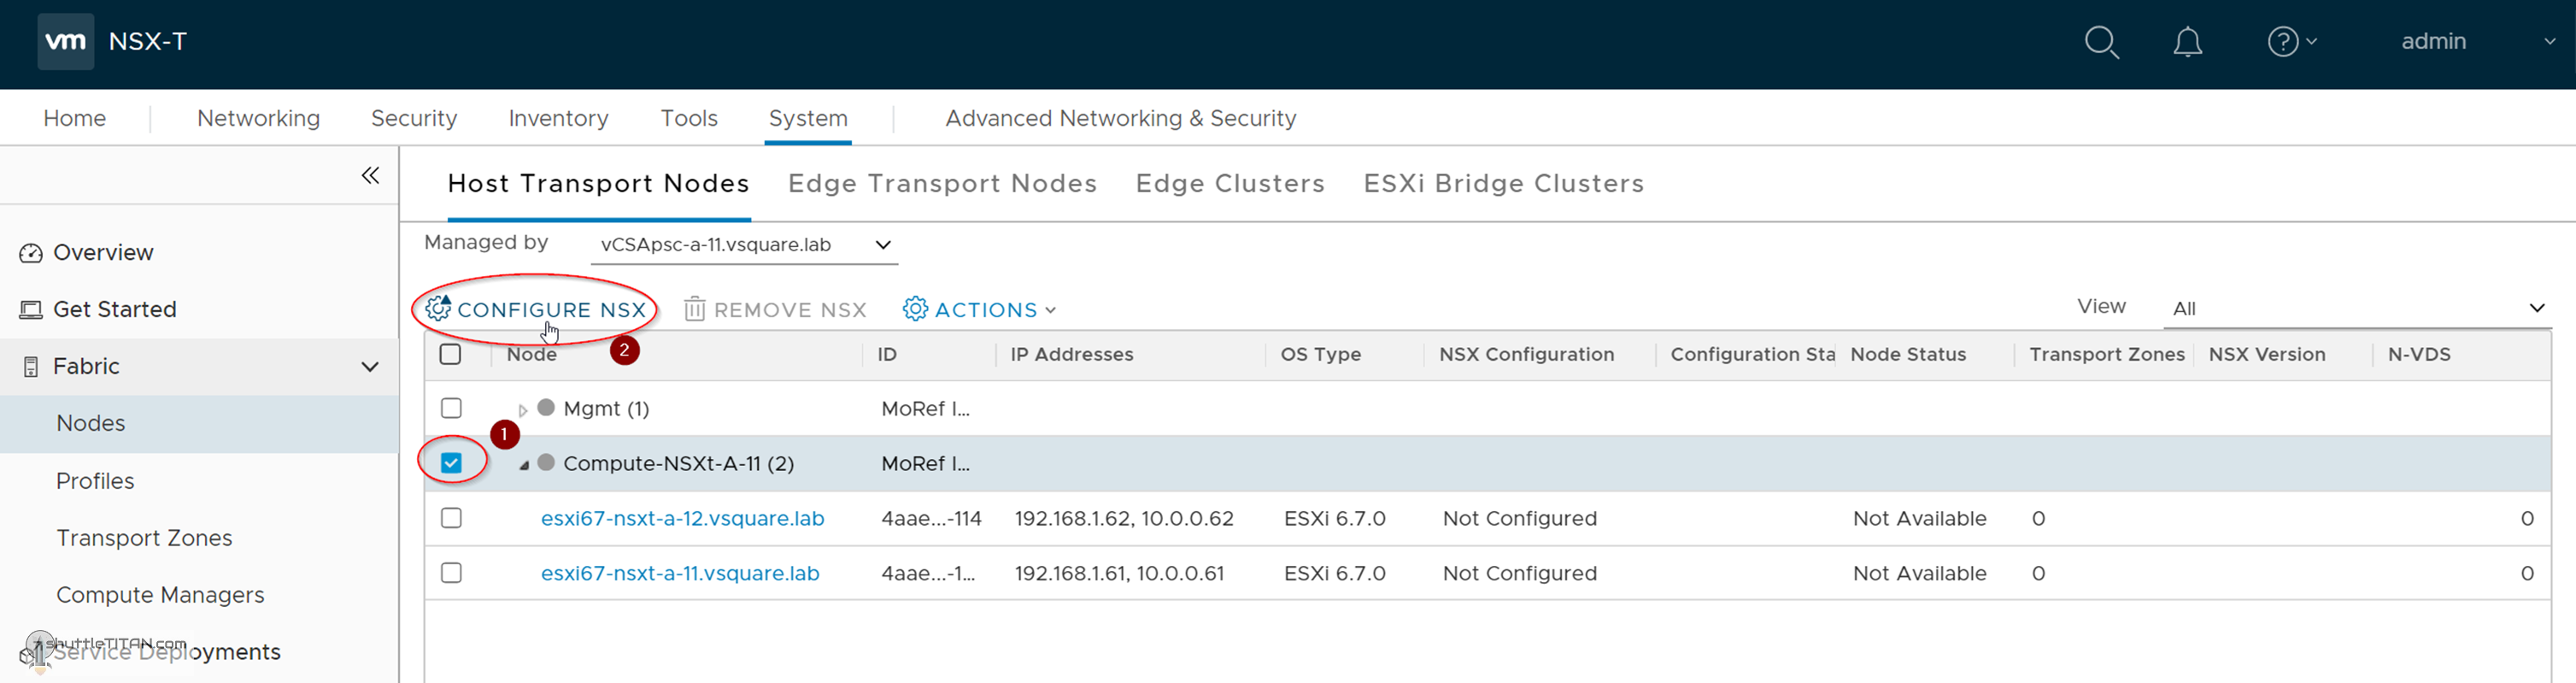
1. System -> Fabric -> Nodes -> Host Transport Nodes -> Select the Site A’s vCenter Server, as shown in the screenshot below:

2. Select the compute cluster and click “Configure NSX”:
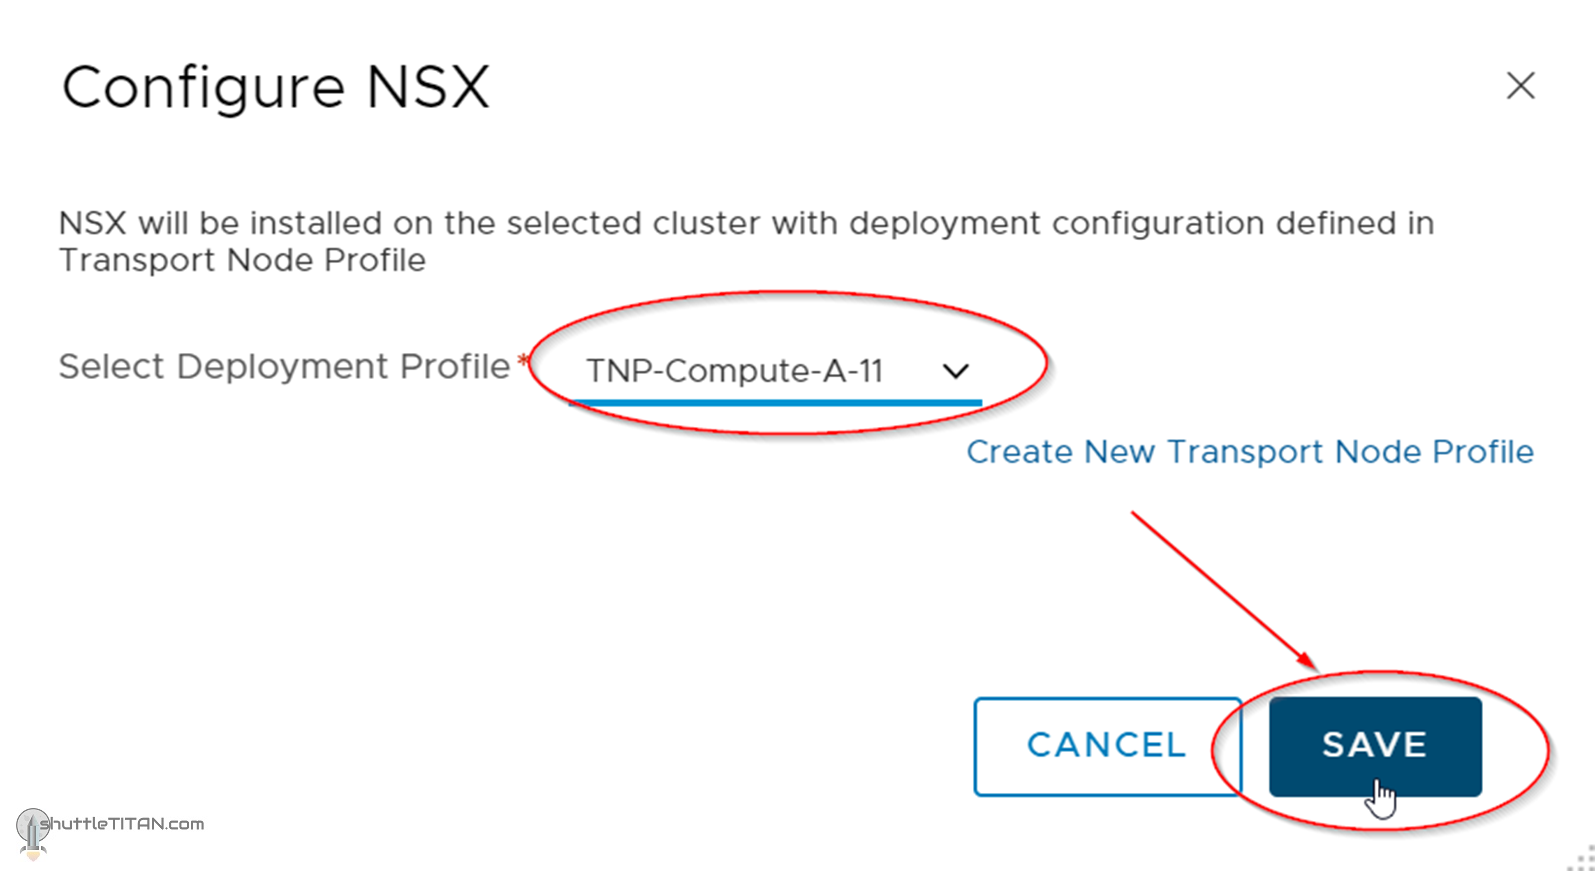
3. Select TNP-Compute-A-11 as Deployment Profile (created in Step – 8) -> Click Save as shown in the screenshot below:
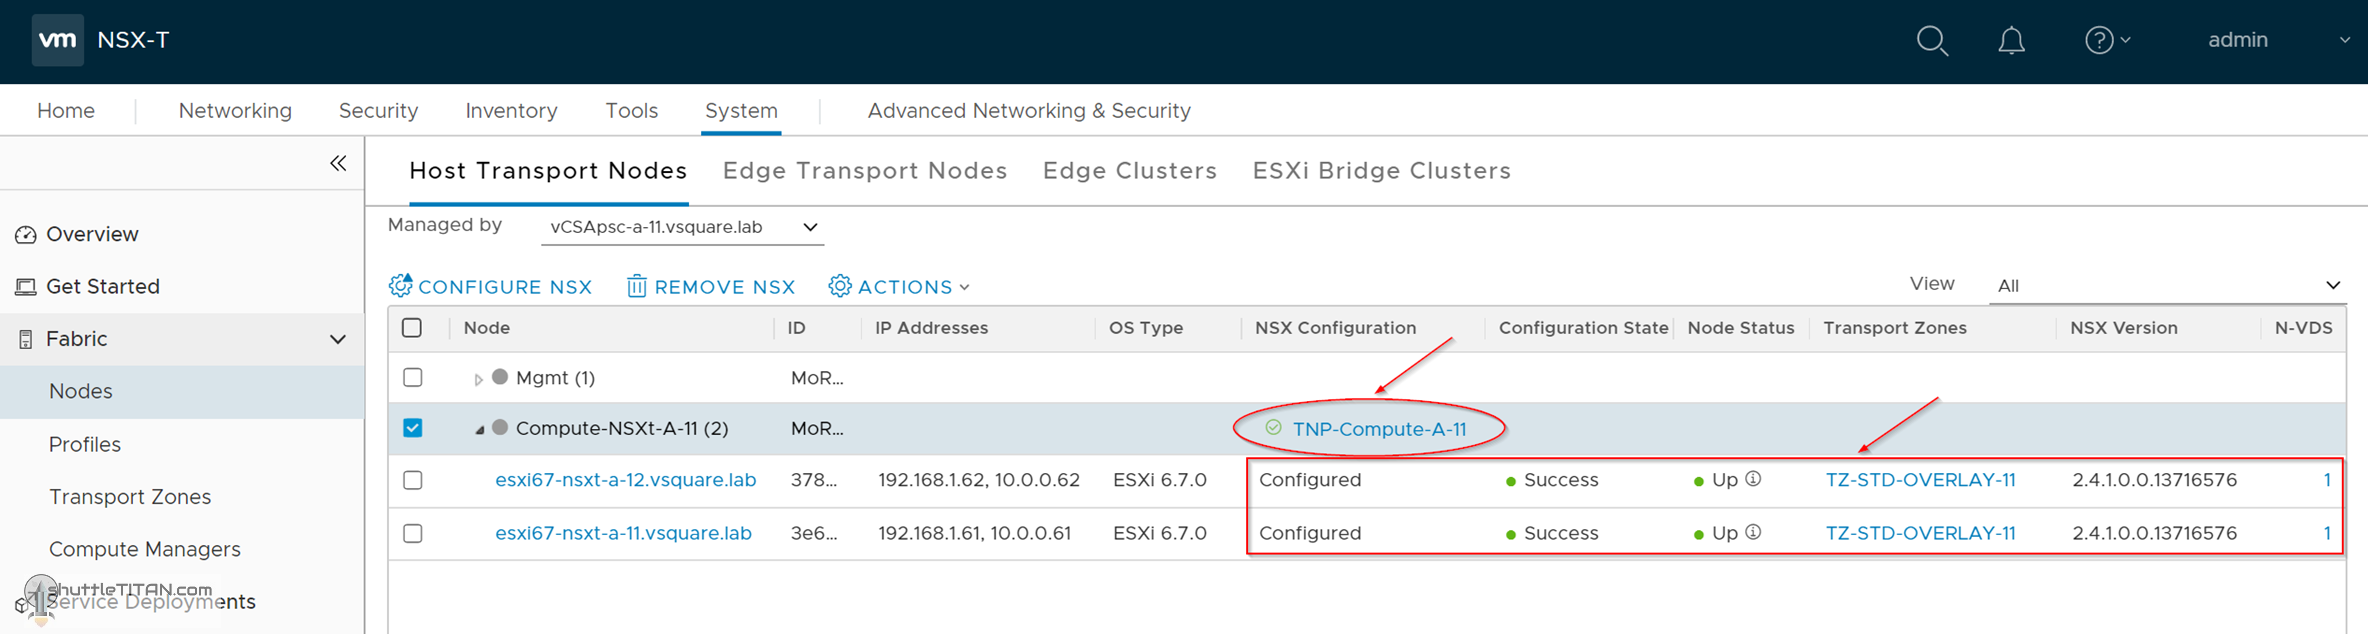
4. Give it a few minutes, and the Configuration State and Node Status will show Success and Up:
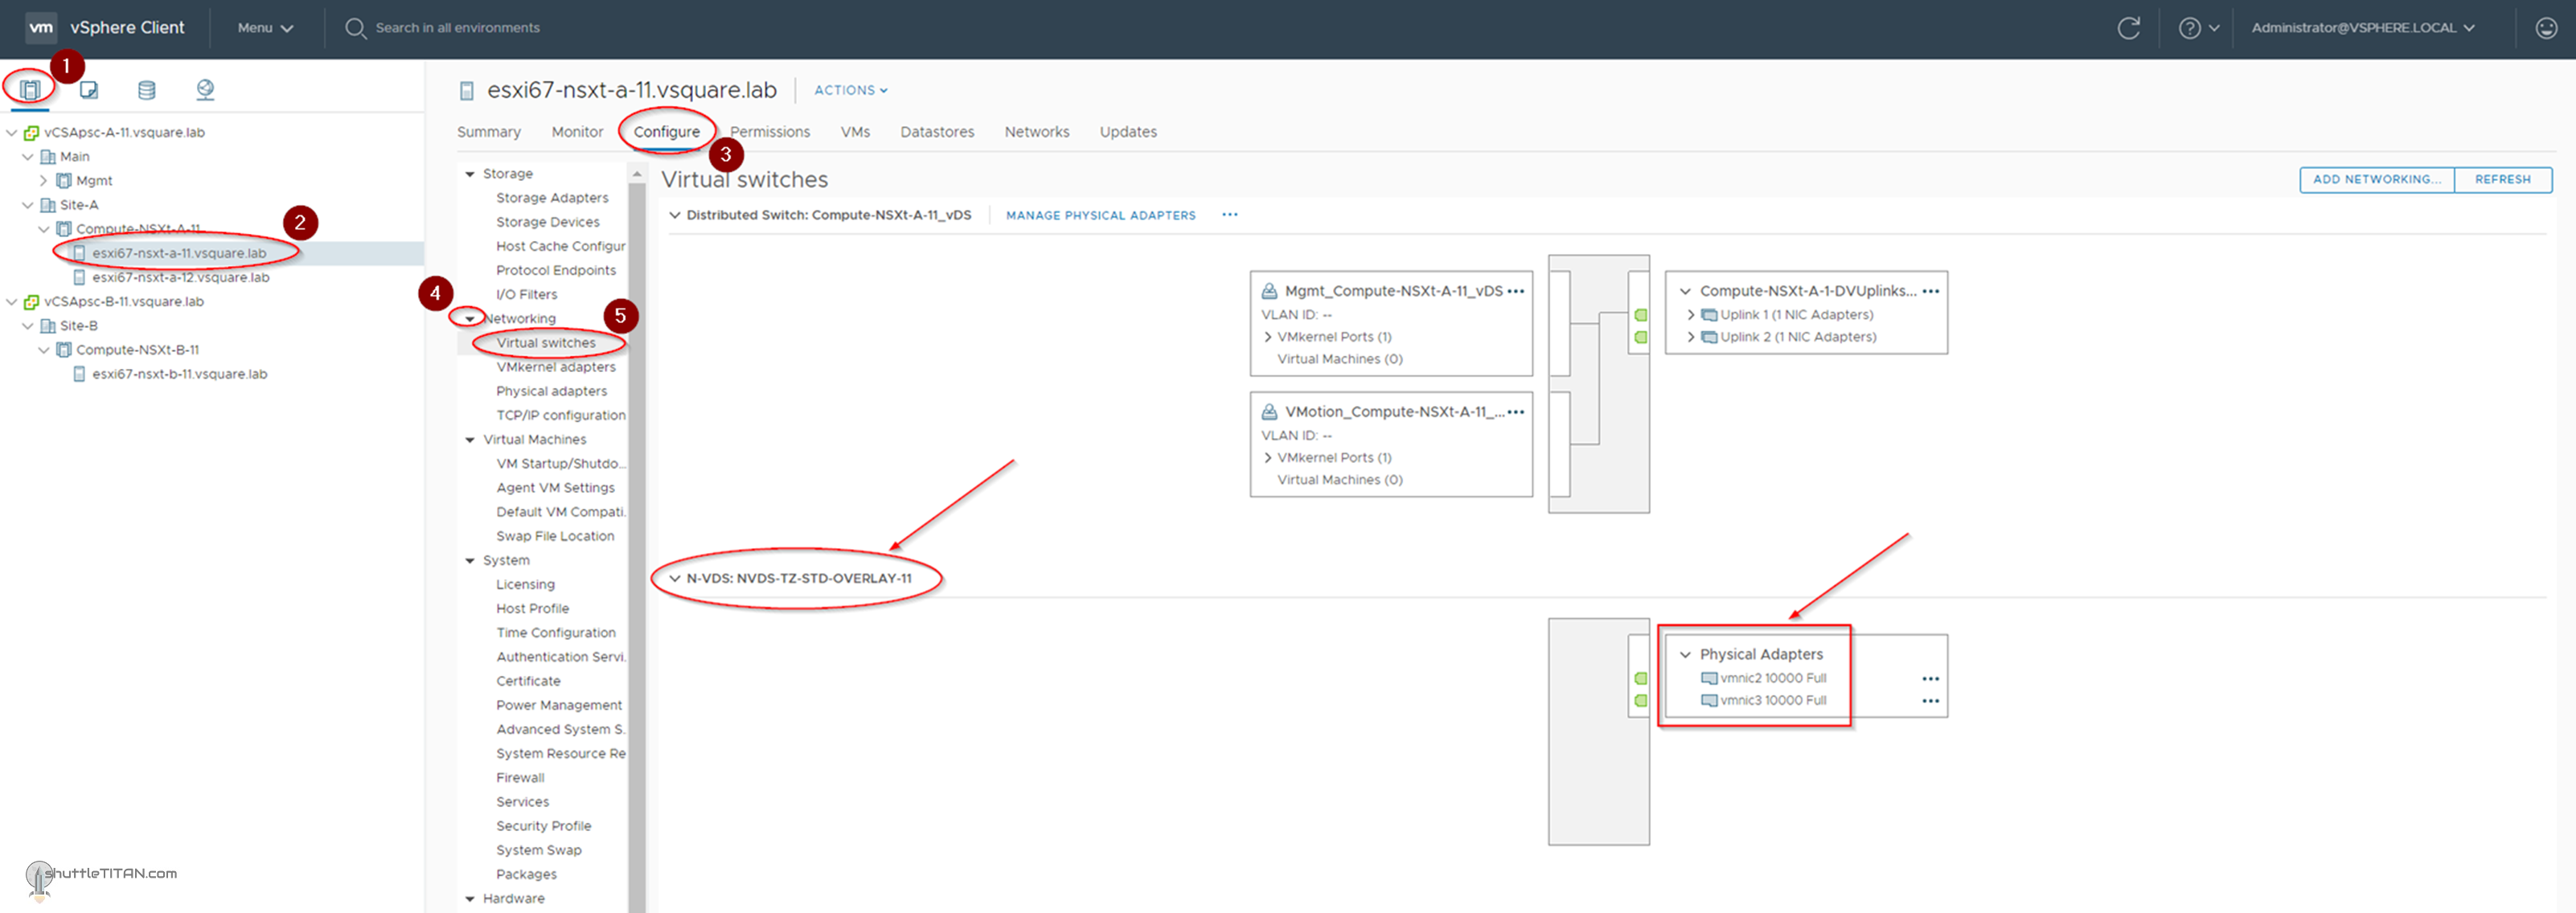
To visualize the N-VDS from vCenter Server – Logon to the vCenter -> Click “Hosts and Clusters” -> Select Host -> Click Configure -> Expand Networking -> Click Virtual switches:
Configure Site B’s ESXi Host as Host Transport Node
1. Go back to the Host Transport Node and select the Site B’s vCenter from the dropdown menu -> Select the Site B’s Compute Cluster -> Click Configure NSX (as shown in the screenshot below):
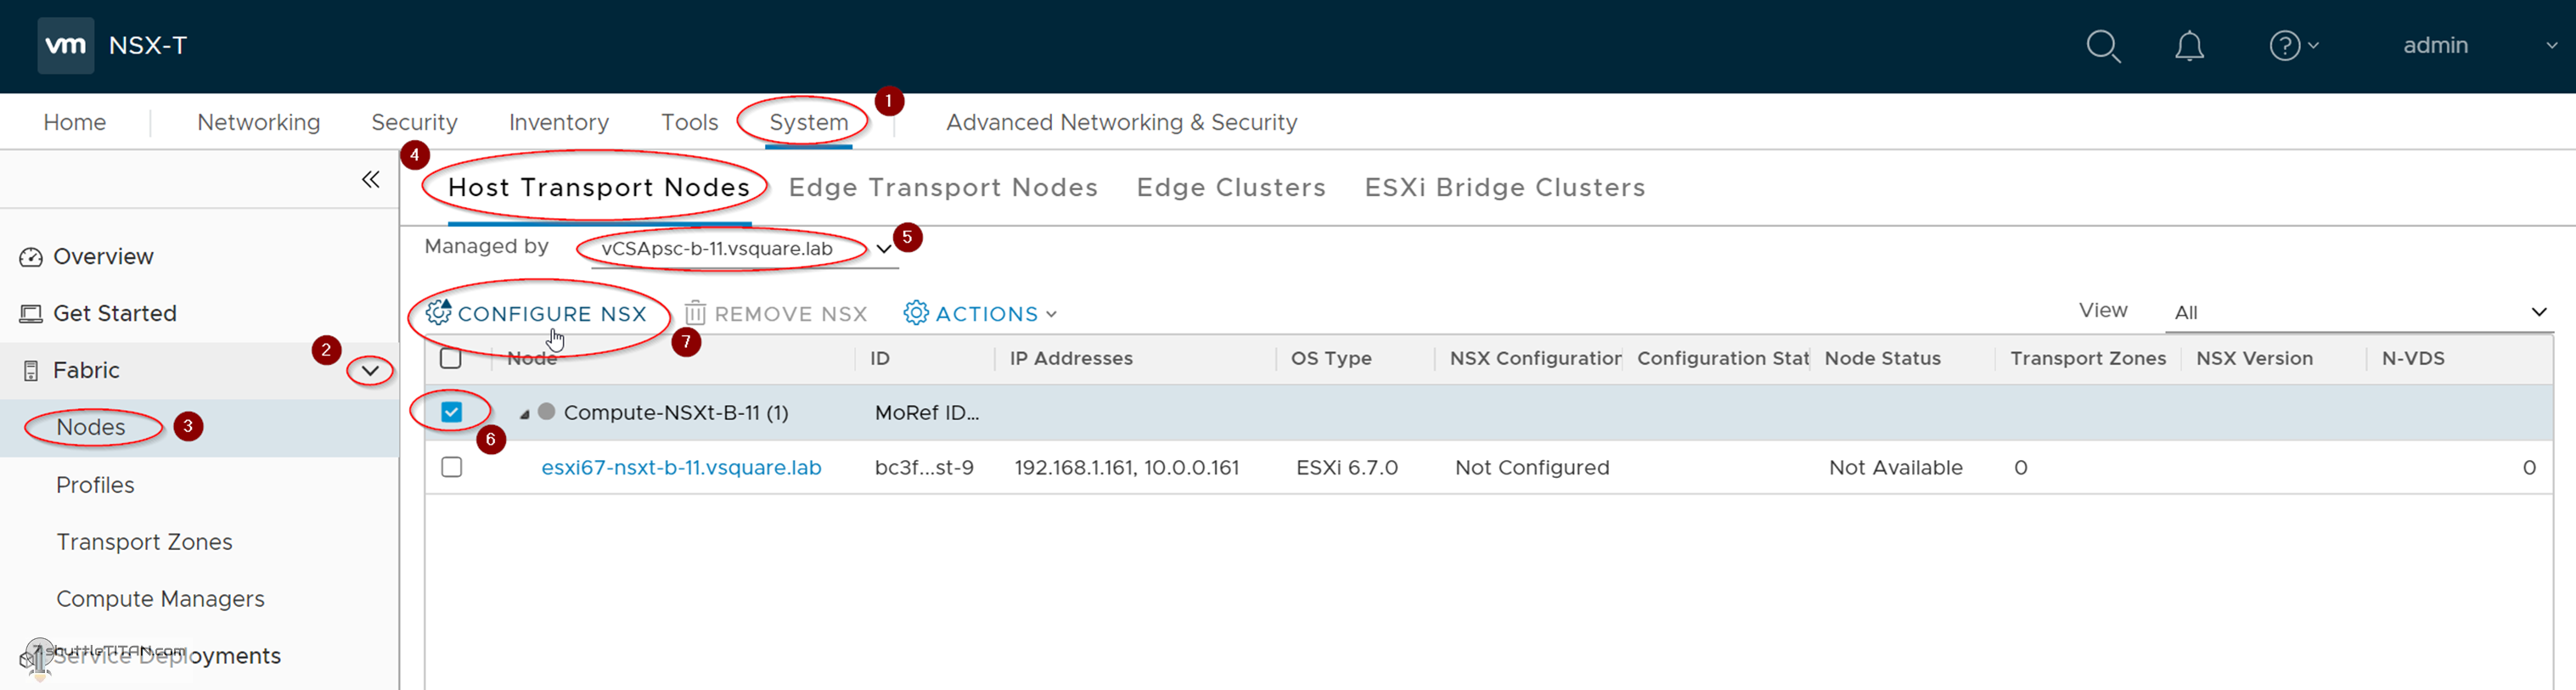
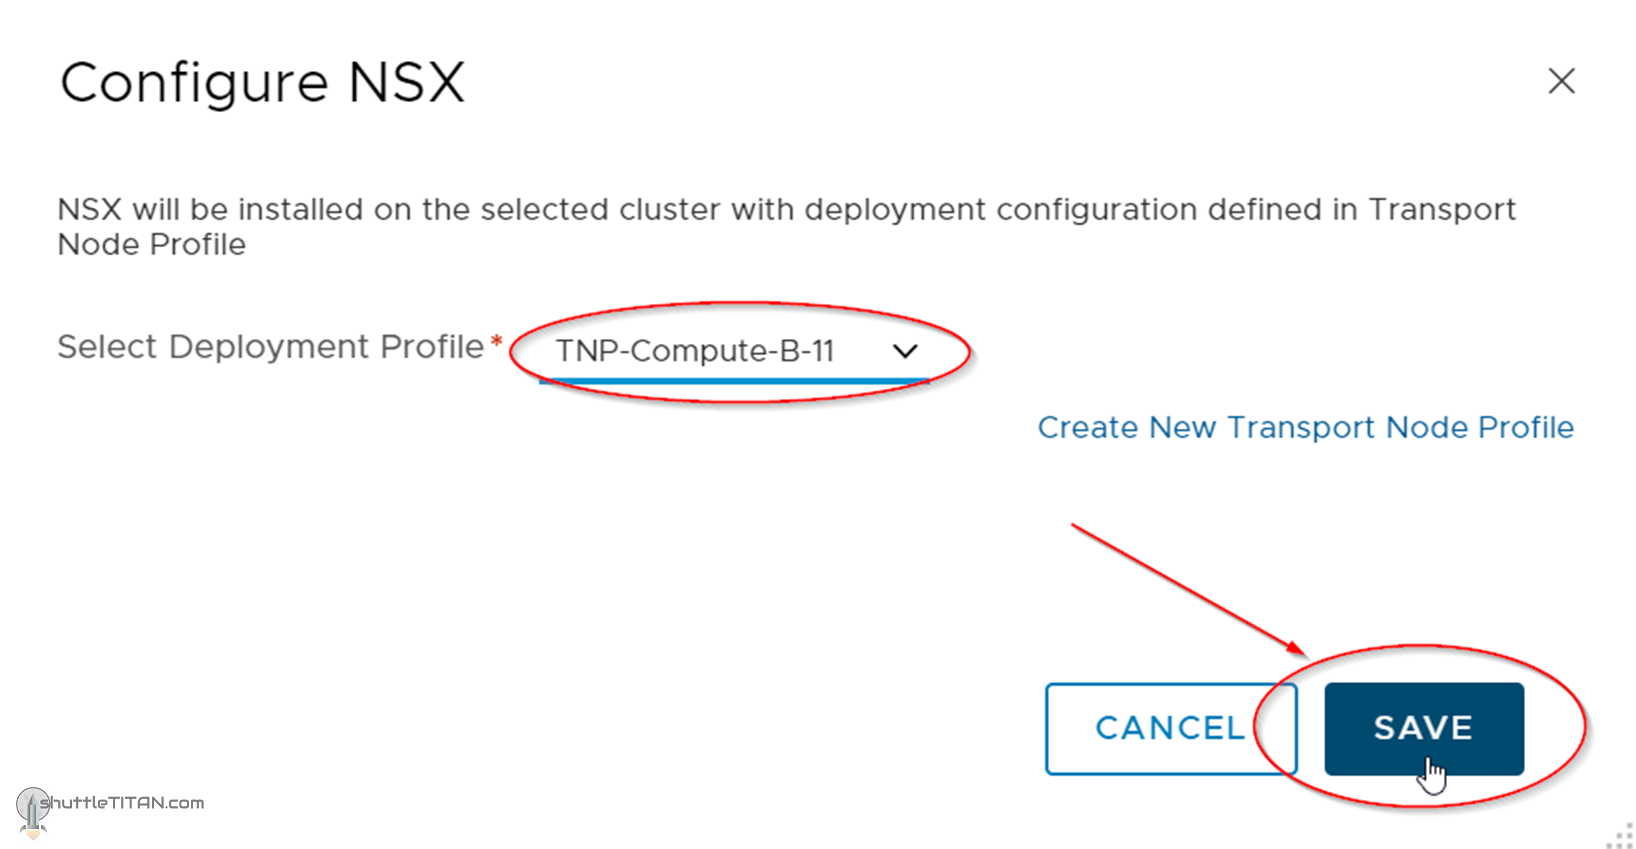
2. Select TNP-Compute-B-11 as Deployment Profile (created in Step – 8) -> Click Save as shown in the screenshot below:
TEP IP Identification and basic connectivity test:
1. System -> Fabric -> Nodes -> Host Transport Nodes -> Select the Site A’s vCenter Server -> Select the Host. Click Physical Adapters -> Look for vmk10 and click the Interface Details icon. It will then display the TEP IP configured (as shown in the screenshot below):
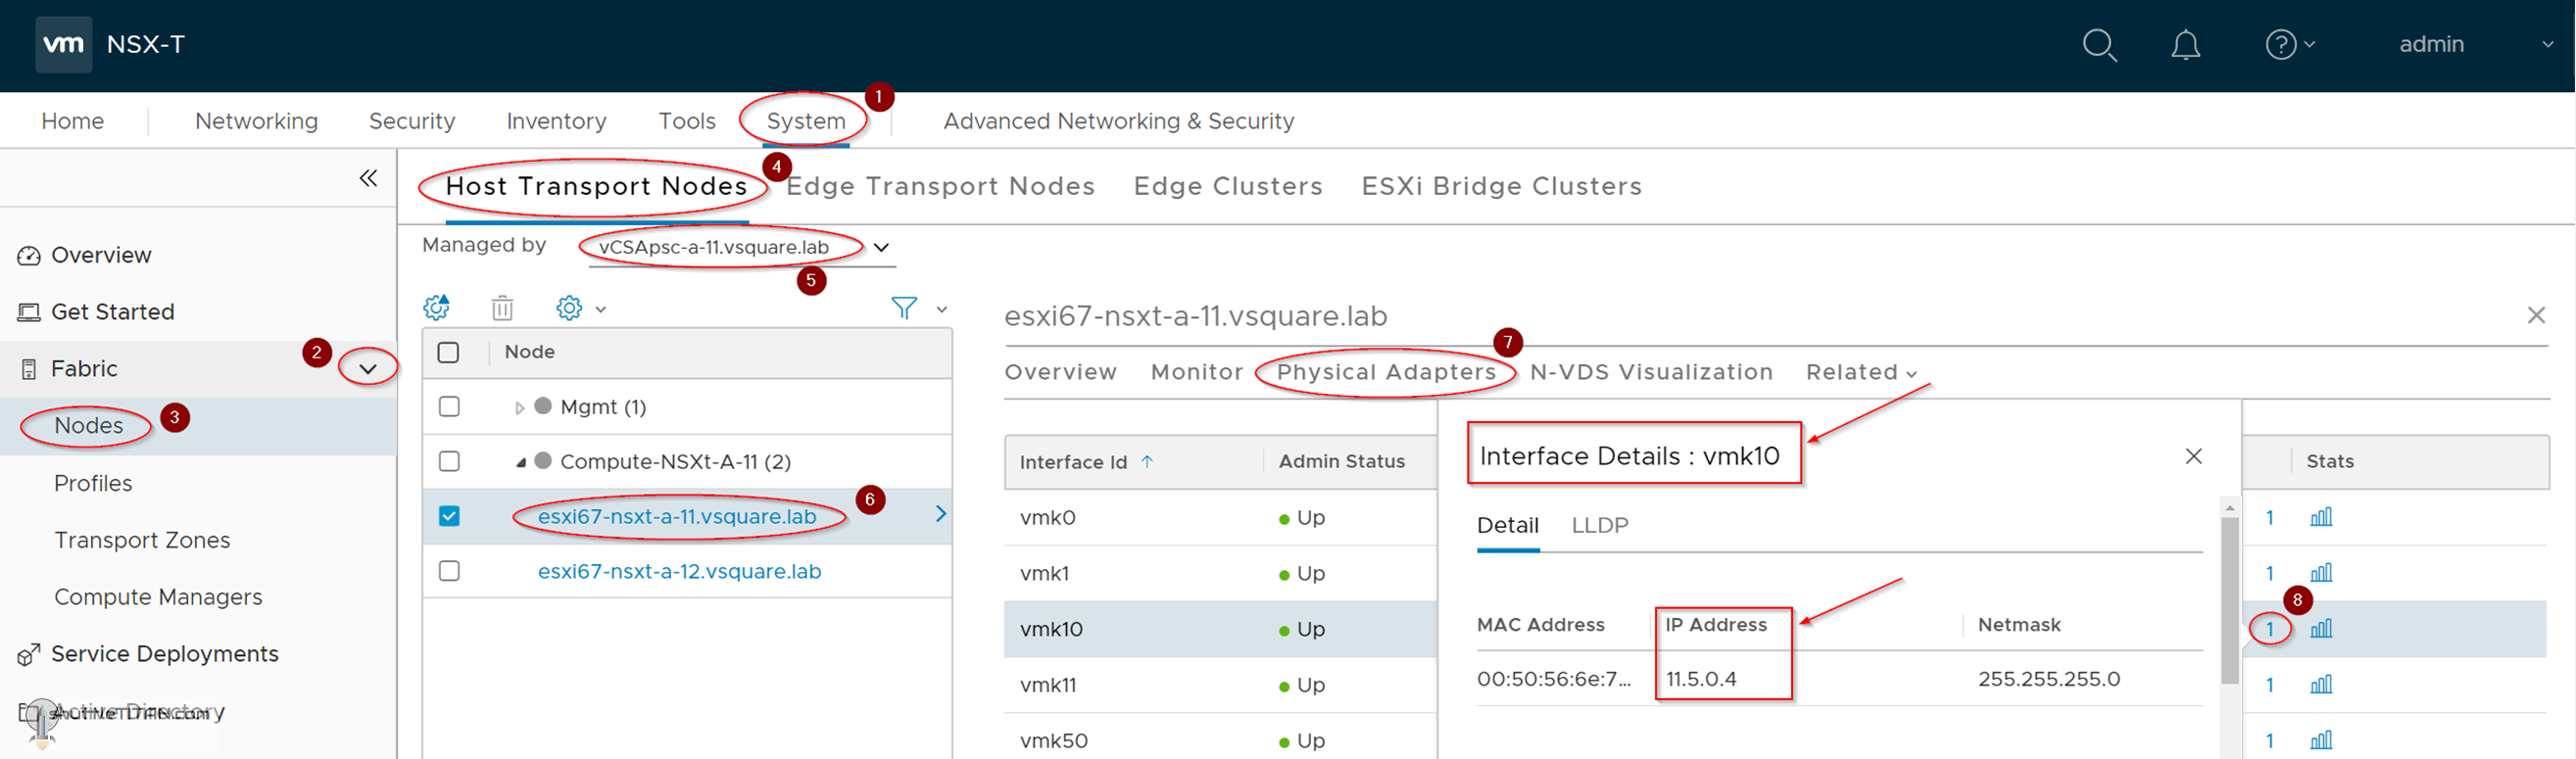
Note: vmk10 and vmk11 are the new vmkernel interfaces created for Tunnel Endpoints.
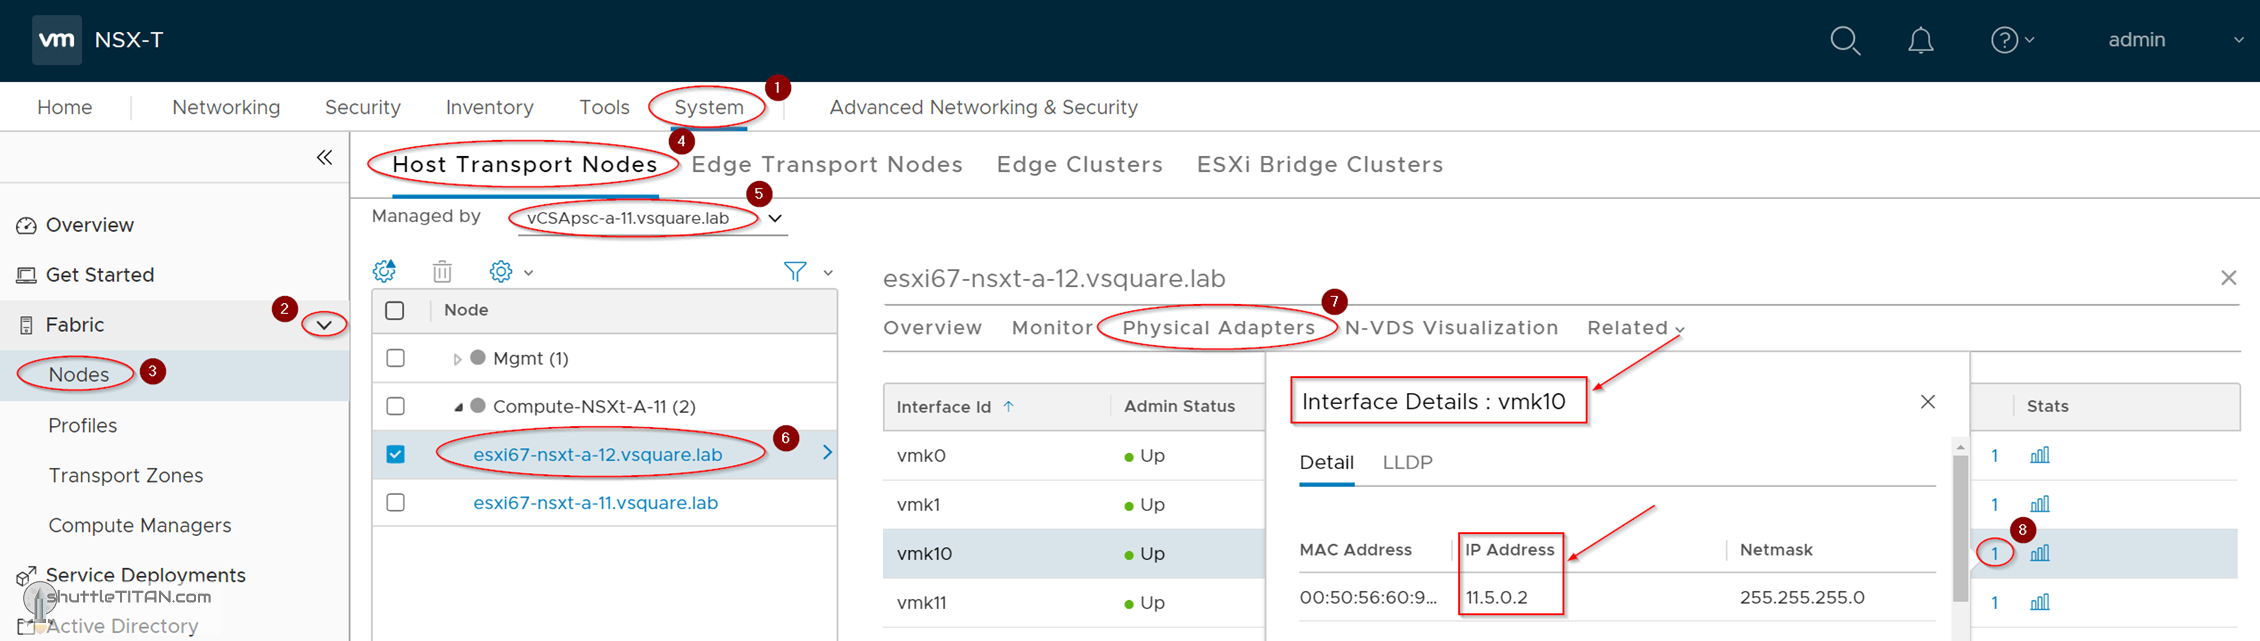
2. Follow the same steps to identify one of the TEP IPs of the second Host:
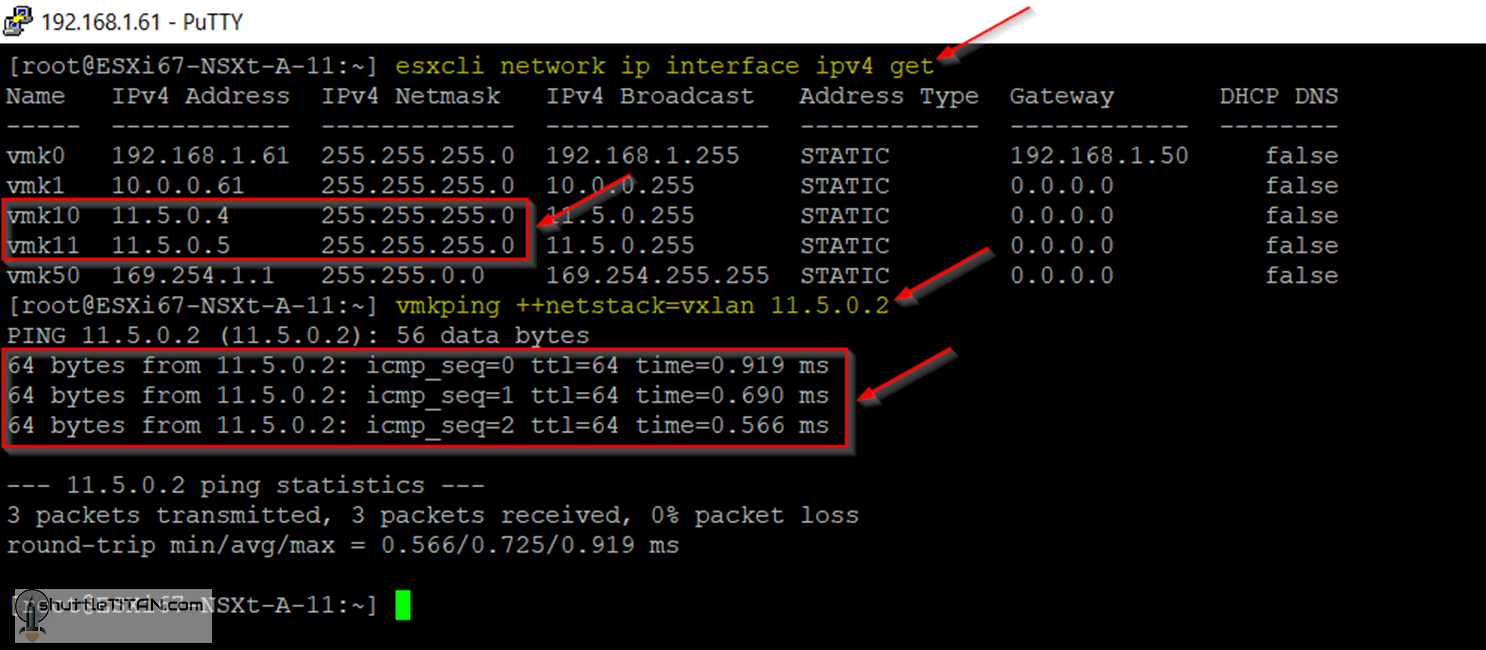
The TEP IPs can also be identified by logging on to the esxi host and running the command below:
esxcli network ip interface ipv4 get
Run the following command to perform a ping test using the TEP interface:
vmkping ++netstack=vxlan 11.5.0.2
Note: Even though the overlay encapsulation used in NSX-T is GENEVE, the esxi command is still the same using the stack vxlan.
Optional Removal Steps
Remove NSX-T Components from Host Transport Node:
At times we may want to remove/uninstall the NSX-T components from the Hosts for maintenance or replacements, should that be the case “Select one or more hosts -> Click Actions > Remove NSX”.
Note: The uninstallation may take two to three minutes. Uninstallation of NSX-T Data Center removes the transport node configuration on hosts and the host is detached from the transport zone(s) and N-VDS switch. Any new host added to the vCenter Server cluster will not be automatically configured until the transport node profile is reapplied to the cluster.
Remove a Transport Node from the transport zone.
Select a Transport Node -> Click Actions -> Remove from Transport Zone.
Note: If the transport node profile is detached from the cluster, the existing host continues to be attached to the transport zone and N-VDS switch but any new hosts added to the cluster would not be configured with N-VDS.
This concludes this step of configuring both site’s Host Transport Node successfully.
Let’s proceed ahead with the next blog in this series to “Install NSX-T Edge VM”, for which their are two options (feel free to click either one of the links below):
Step 10 (Option 1) – Install NSX-T Edge VM on ESXi using vSphere UI
Step 10 (Option 2) – Install NSX-T Edge VM on ESXi using NSX-T Manager UI