The previous step, discussed Host Transport Nodes, step-by-step instructions on how to configure ESXi Host as Host Transport Node, TEP IP Identification and basic connectivity validation. This blog is the “Step 10 (Option 2)” of the NSX-T Installation series, where we will discuss NSX-T Edge Nodes, Edge Transport Node design and step-by-step instructions on how to install NSX-T Edge VM on ESXi using NSX-T Manager UI.
————————————————————————————————————————————————————— But before we proceed, I would encourage you to briefly skim through my other blogs below, which you may find useful for this step:
If you are deploying this in your home lab or performing a PoC in a nested vSphere Environment, I would also suggest you have a quick glance of my blog Home Lab Setup – Nested ESXi Host’s networking for NSX-T. —————————————————————————————————————————————————————
Unlike NSX-V Edge, an NSX-T Edge is an empty container appliance and does not do anything until you create logical routers. Each logical router contains a services router (SR) and a distributed router (DR). A DR is distributed across all transport nodes that belong to the same transport zone and an SR is centrally instantiated on the Edge Appliance(s). An SR instance is required for services that cannot be distributed i.e. Physical Connectivity, NAT, DHCP, Load Balancers, etc.
There are two ways to Install an NSX Edge VM via the UI:
Note: The Option 2 (this blog), joins the NSX-T Edge VM to the Management plane automatically and configures the N-VDS – which is a separate Step 11 in this NSX-T Installation series.
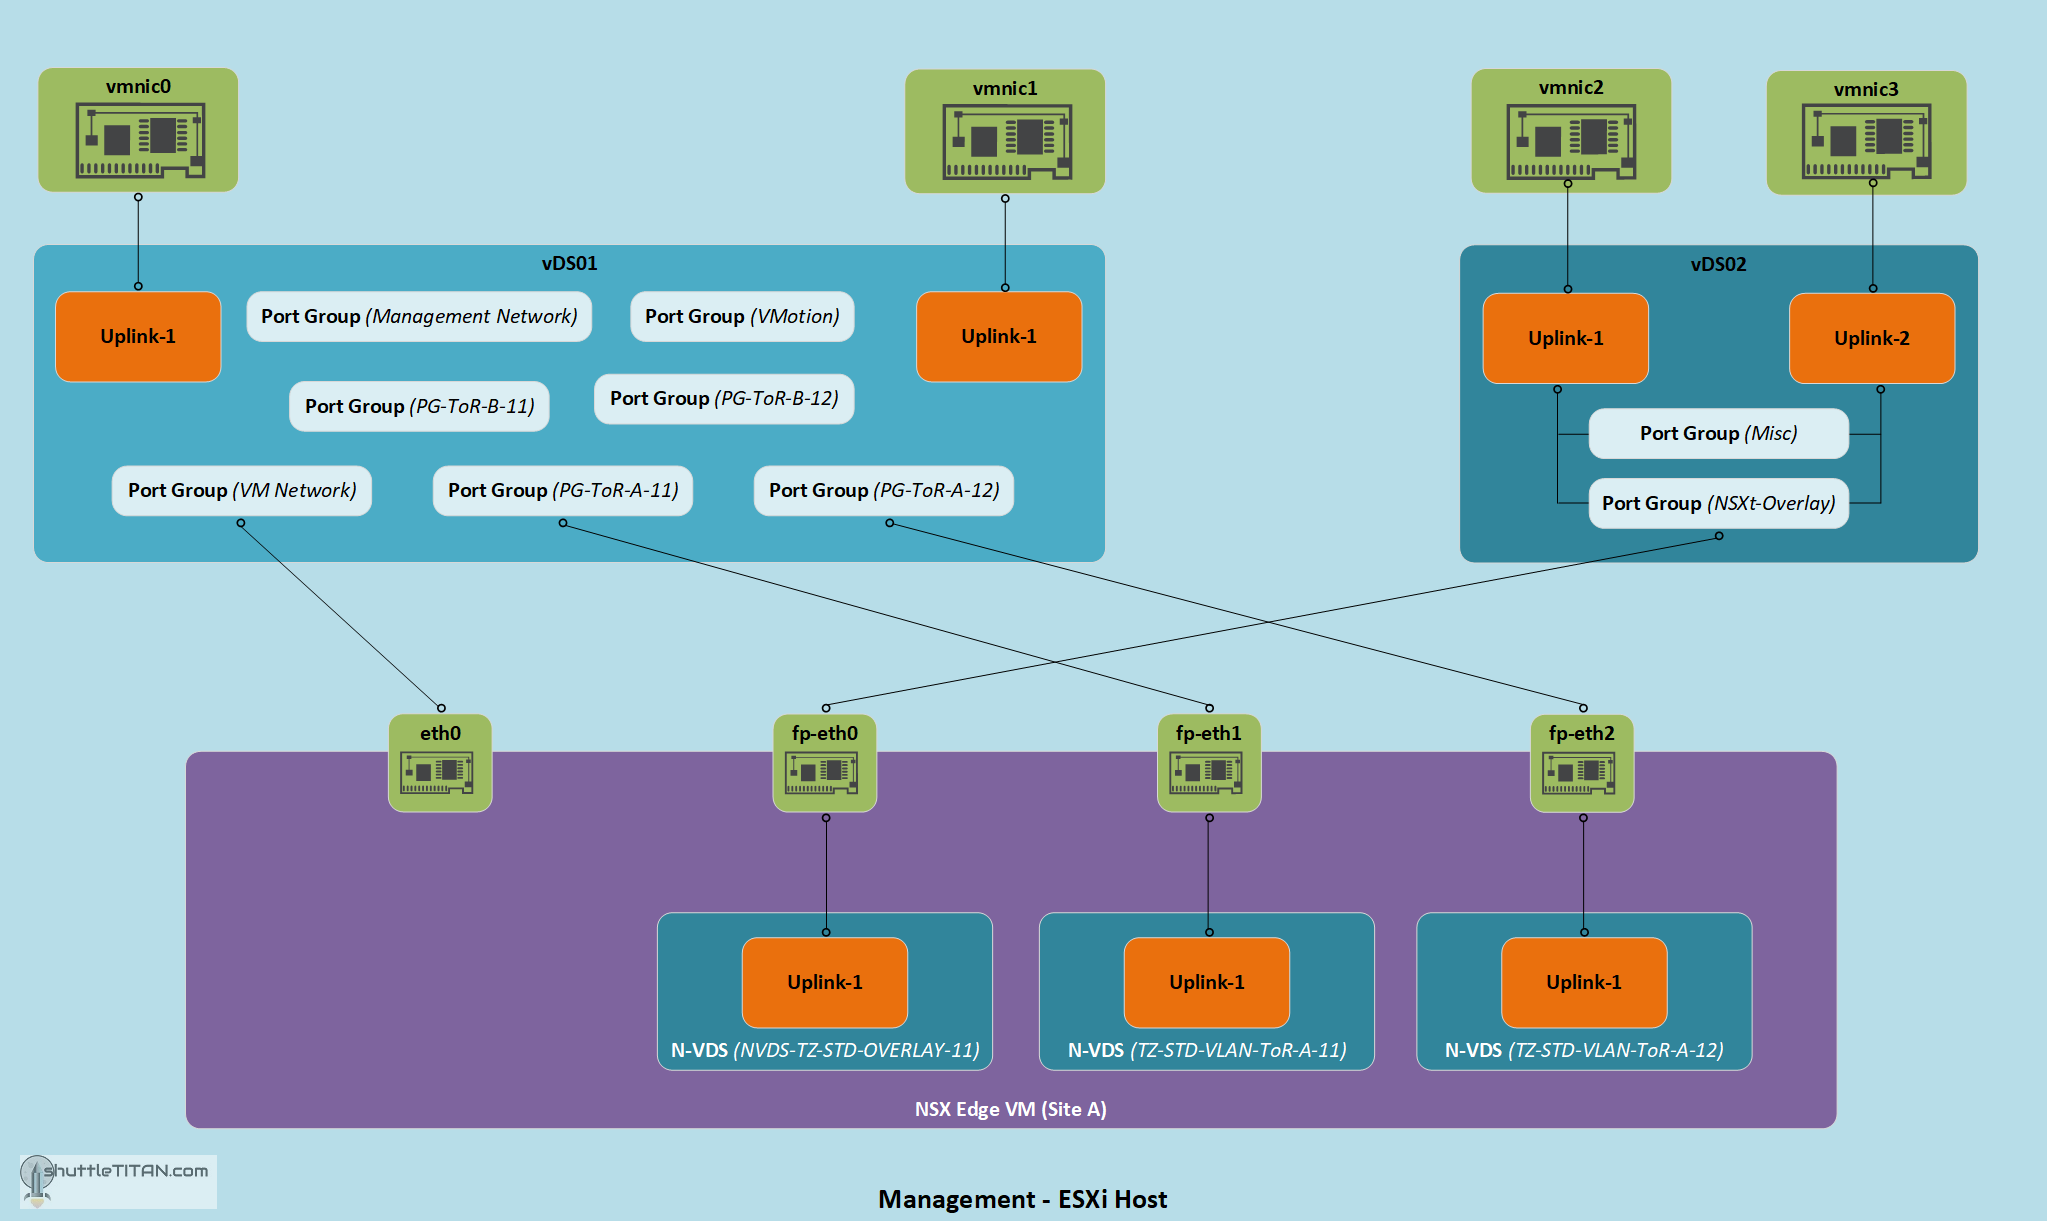
Ok, if your ESXi Hosts (in the Management/Edge vSphere cluster have 4 pnics) and separate physical compute hosts, the NSX-T Edge uplink design may look like below:
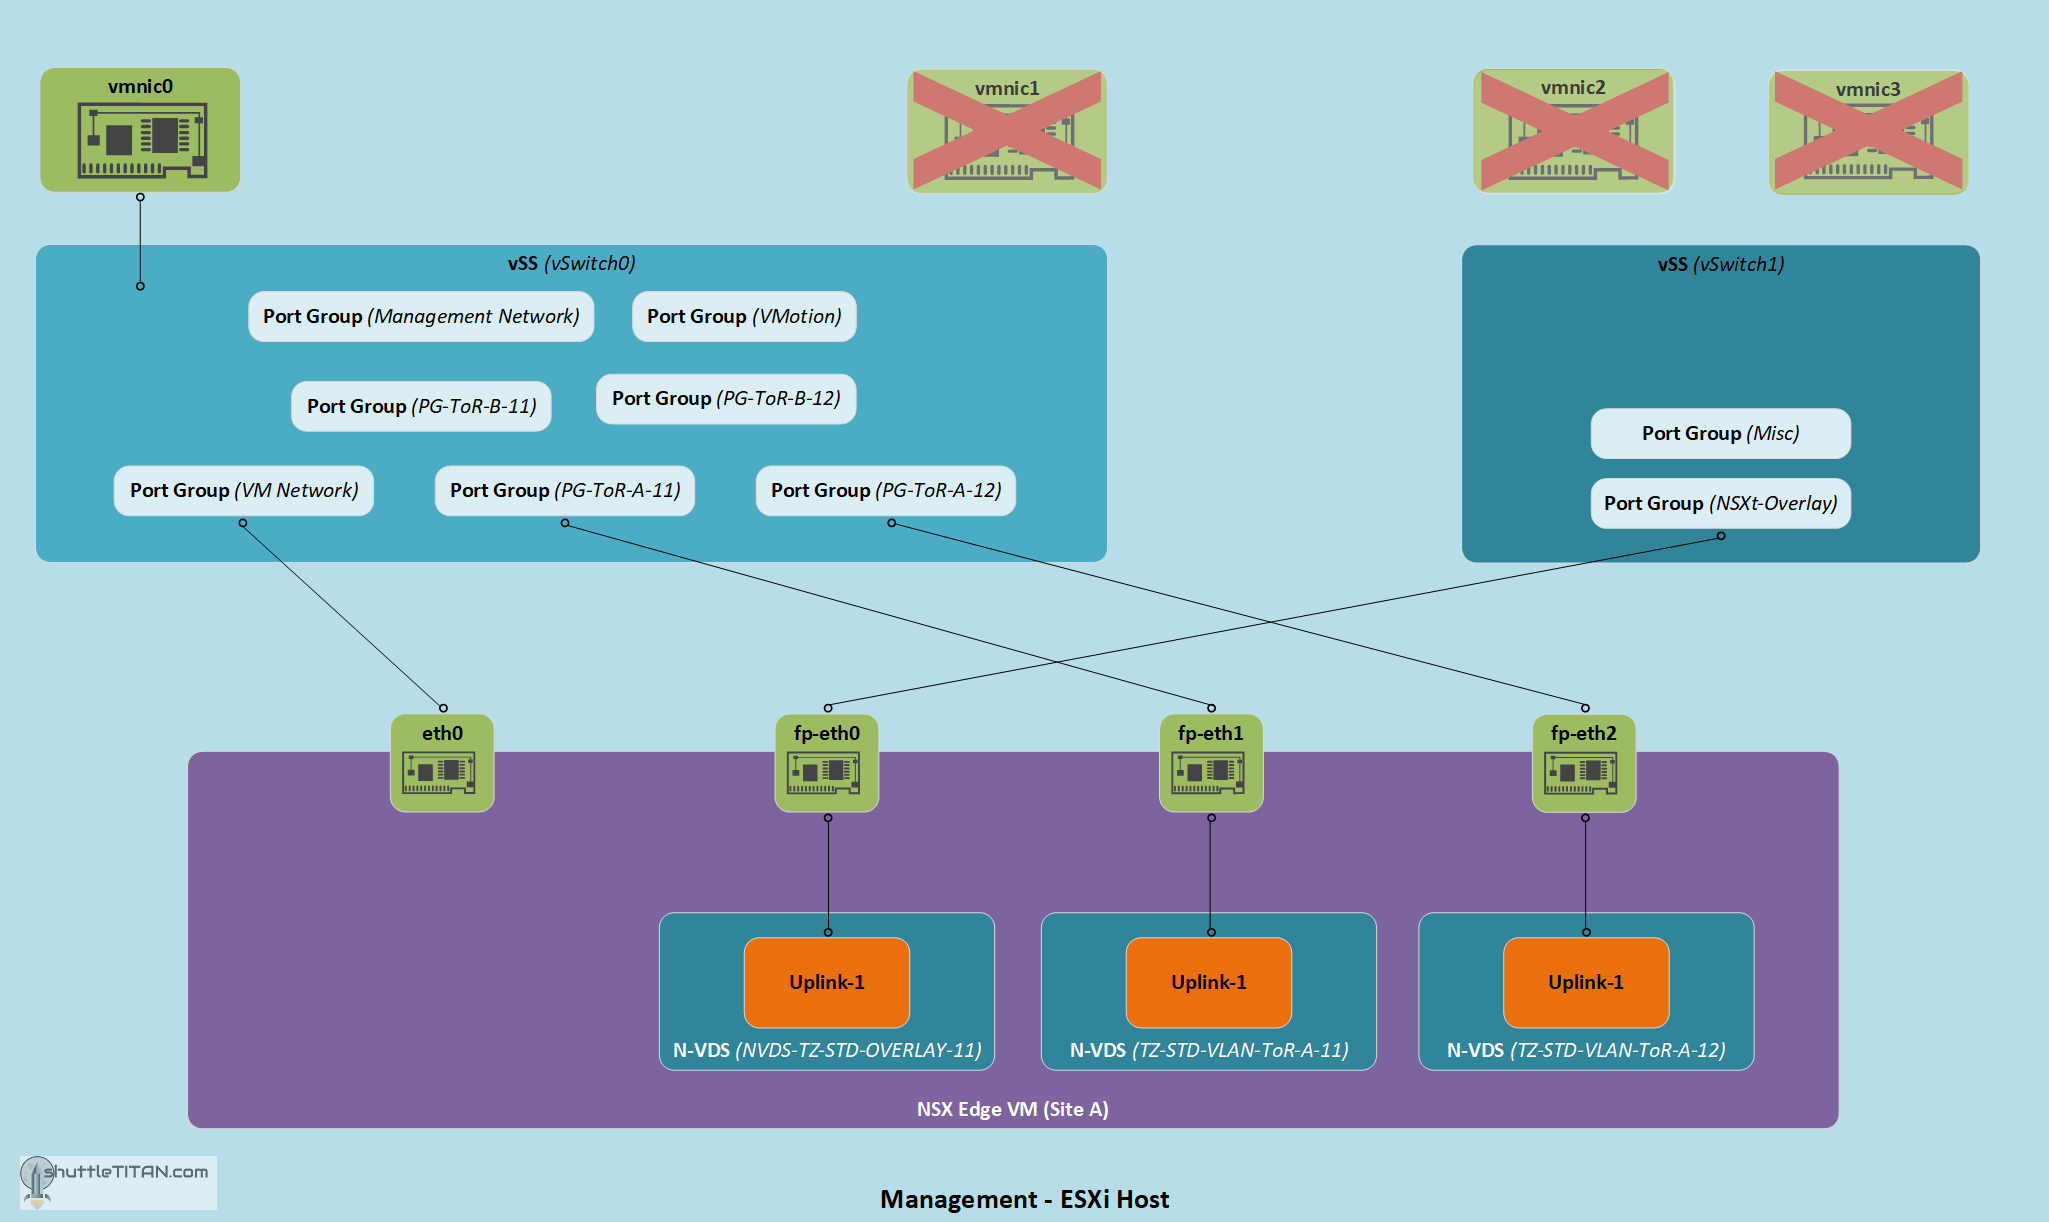
However, if you are deploying this in a Home Lab or performing a PoC, following my blog Home Lab Setup – Nested ESXi Host’s networking for NSX-T, the NSX-T Edge design will look like below, as I am using only ONE pnic on my Management/Edge ESXi Host and all Compute Edge ESXi hosts are nested:
With that let’s get started…
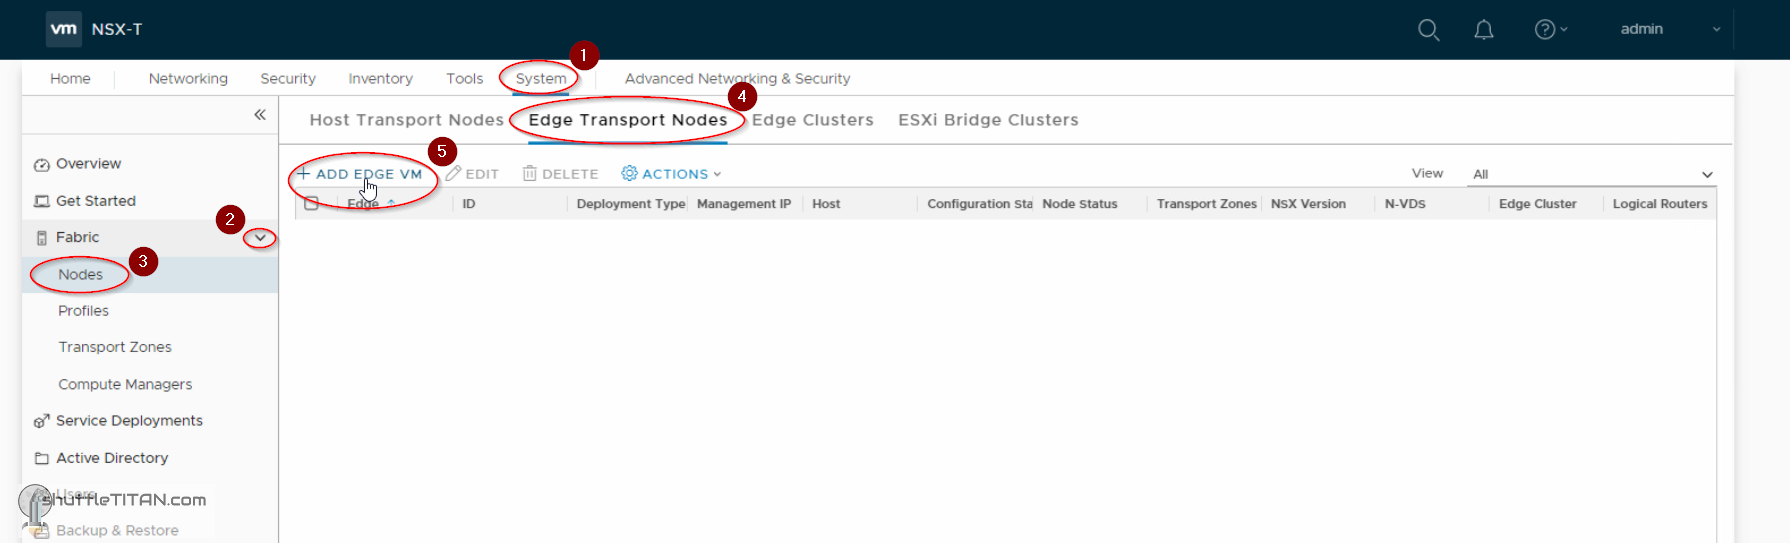
1. System -> Fabric -> Nodes -> Edge Transport Nodes -> Add Edge VM
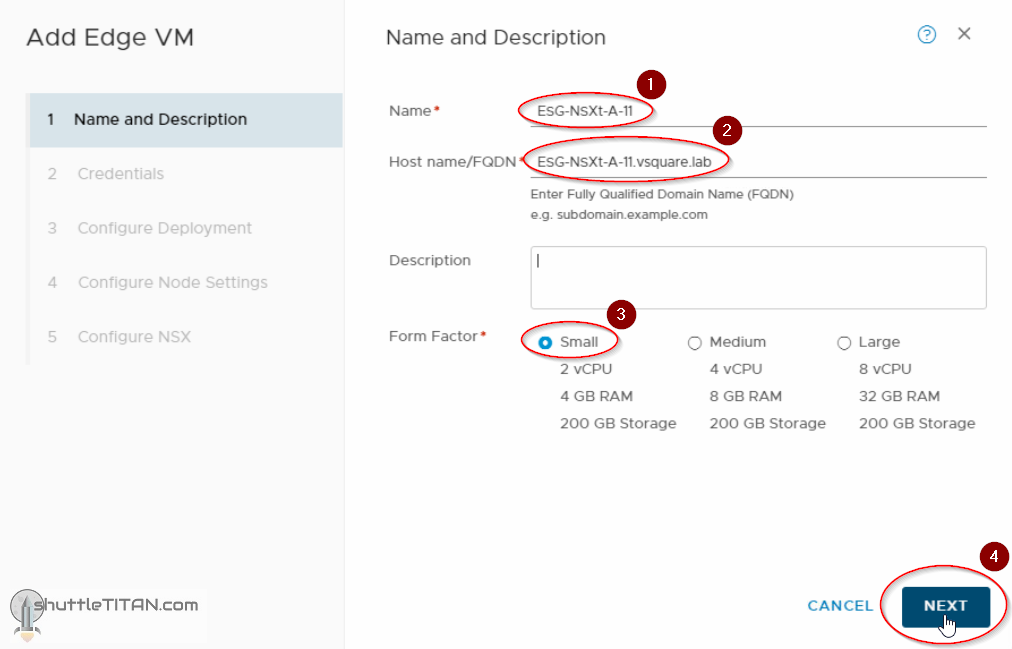
2. Enter the name, FQDN and select the “form factor”. Click Next: Note: For production only medium and large size are supported.
3. Enter the “admin”, “root” and “audit” passwords and click Next:
4. Select the Compute Manager, Cluster, Host and Datastore, Click Next: The Compute Manager will be Site A’s i.e. vCSApsc-a-11 i.e. in this case.
5. Select Static and enter the IP, DG and the “Port Group” as Management Interface (I am using “VM Network”). Specify the Domain Names, DNS and NTP Servers:
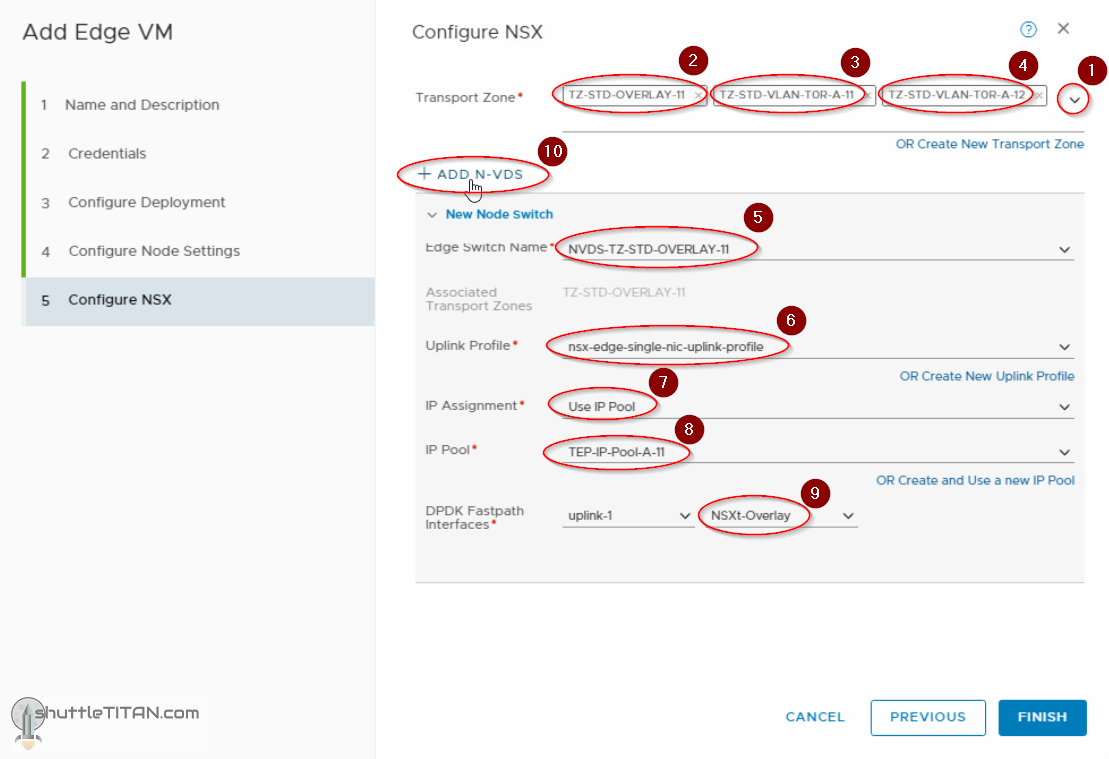
6. Select the Overlay and the two ToR Transport Zones. Select the Overlay N-VDS from the drop-down menu, uplink profile, IP Pool, DPDK fastpath interface as “NSXt-Overlay” and click ADD N-VDS, as shown in the screenshot below:
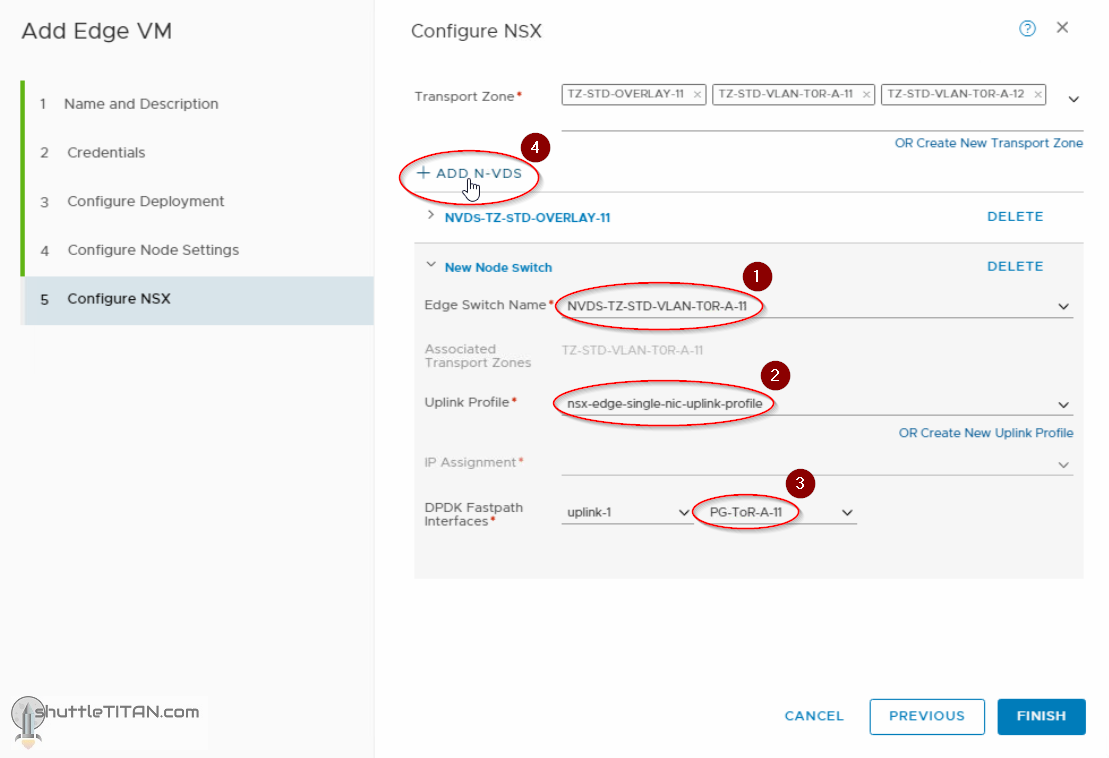
7. Select the first ToR N-VDS from the drop-down menu, uplink profile, DPDK fastpath interface as “PG-ToR-A-11” and click ADD N-VDS, as shown in the screenshot below:
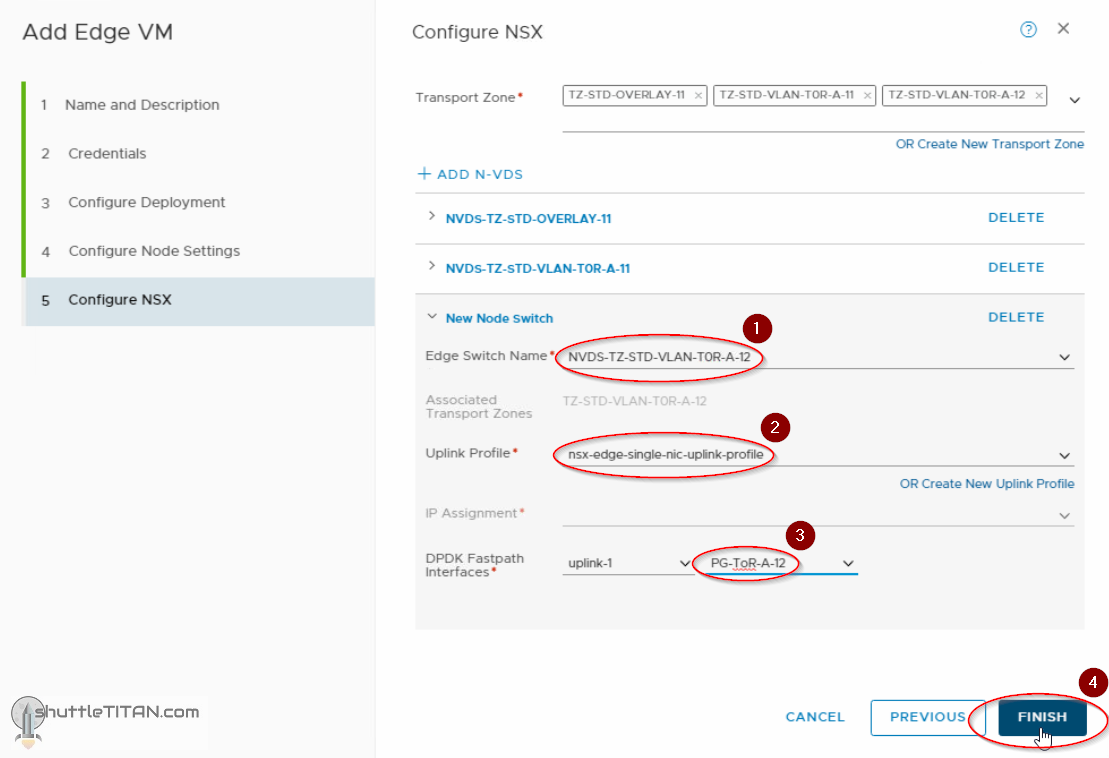
8. Select the second ToR N-VDS from the drop-down menu, uplink profile, DPDK fastpath interface as “PG-ToR-A-12” and click ADD N-VDS, as shown in the screenshot below:
9. Edge VM deployment progress can also be monitored by logging on to the vCenter -> “Recent Tasks”:
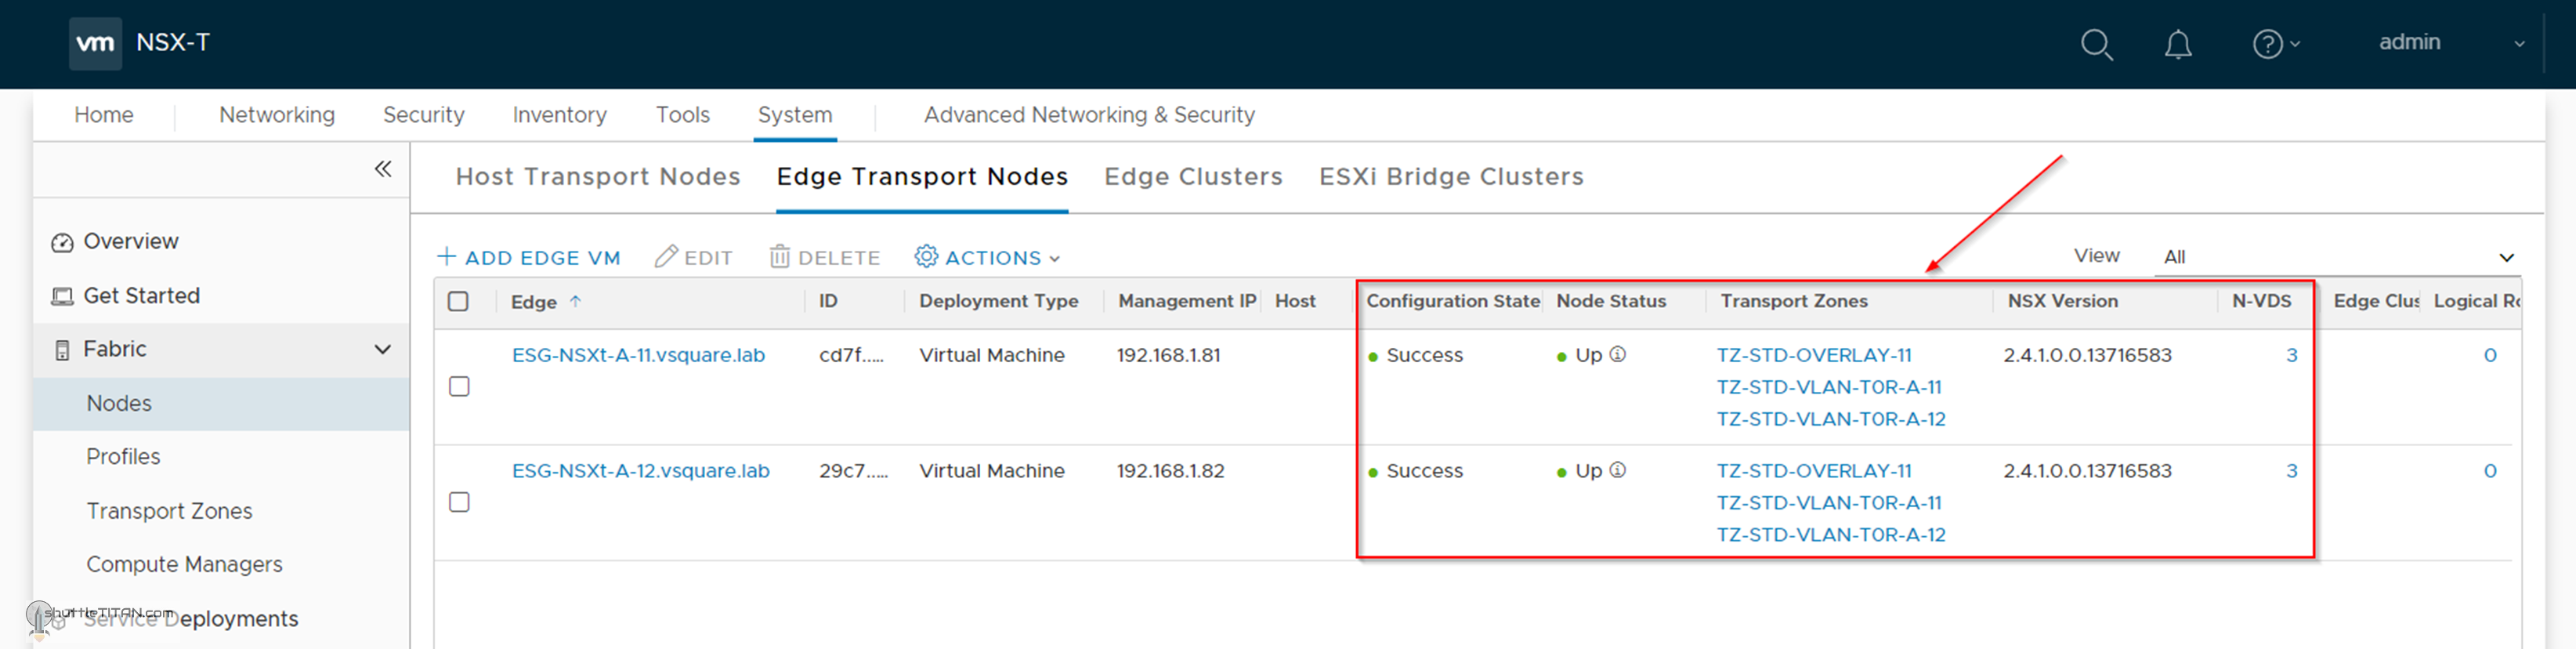
10. Monitor the “Configuration Status” tab and once complete the “Configuration Status” will then show “Success”
I have noticed you are using the IP 192.168.1.50 for Gateway, DNS and also NTP but I could not see it on your topology. May I ask what sort of device it is? Is this the NSX-v edge device you said you are using as a gateway?
Hi,
Its a single VM with the role of DNS server and pretending to be NTP and GW, I am using the same IP for NTP and GW just to populate the fields as it was a lab exercise. However, as all the management components/supporting infrastructure VMs are on the same subnet, the GW IP does not come into play. The NSX-V edge VM is completely separate and is simulating a physical router to form a BGP peer with T0 Gateway in Step 17.
This series is focused on NSX-T only, the underlying supporting infrastructure was not in scope and hence why I did not include them in the topology – I will clarify it in Step 0 – thanks for bringing this up.
We use cookies on our website to give you the most relevant experience by remembering your preferences and repeat visits. By clicking “Accept”, you consent to the use of ALL the cookies.
This website uses cookies to improve your experience while you navigate through the website. Out of these cookies, the cookies that are categorized as necessary are stored on your browser as they are essential for the working of basic functionalities of the website. We also use third-party cookies that help us analyze and understand how you use this website. These cookies will be stored in your browser only with your consent. You also have the option to opt-out of these cookies. But opting out of some of these cookies may have an effect on your browsing experience.
Necessary cookies are absolutely essential for the website to function properly. This category only includes cookies that ensures basic functionalities and security features of the website. These cookies do not store any personal information.
Any cookies that may not be particularly necessary for the website to function and is used specifically to collect user personal data via analytics, ads, other embedded contents are termed as non-necessary cookies. It is mandatory to procure user consent prior to running these cookies on your website.


Hi Varun, Thanks for such a beautiful piece.
I have noticed you are using the IP 192.168.1.50 for Gateway, DNS and also NTP but I could not see it on your topology. May I ask what sort of device it is? Is this the NSX-v edge device you said you are using as a gateway?
Thanks,
Hi,
Its a single VM with the role of DNS server and pretending to be NTP and GW, I am using the same IP for NTP and GW just to populate the fields as it was a lab exercise. However, as all the management components/supporting infrastructure VMs are on the same subnet, the GW IP does not come into play. The NSX-V edge VM is completely separate and is simulating a physical router to form a BGP peer with T0 Gateway in Step 17.
This series is focused on NSX-T only, the underlying supporting infrastructure was not in scope and hence why I did not include them in the topology – I will clarify it in Step 0 – thanks for bringing this up.
Hope this helps.