This blog is a continuation of the “Planned” or “Unplanned” failover of NSX-V components i.e. NSX Manager, controllers, universal distributed logical routers in an Active/Passive datacentre scenario i.e. all North/South routing flow via one site’s ESG(s).
Just to reverberate, I have split this topic into three parts:
- Part 1 (here), talks about:
- Use Cases
- Assumptions
- Current state and Target State i.e. before and after failover
- Pre-requisites
- Summary of the Failover Plan
- Part 2 (here), talks about the failover configuration steps to make Site-B “Primary”
- Part 3 (this blog), talks about the configuration steps required after Site-A comes back online to avoid conflicts.
- Part 1 (here), talks about:
I would encourage you to visit the previous blog Part 2 and get familiar the failover configuration steps to make Site-B “Primary” in this Cross-vCenter NSX Design, before proceeding ahead.
Let’s recap a brief summary of the failover steps followed in Part 1, in the previous blog below:
Site-A Steps: (Only in case of a planned Failover):
- Shutdown all ESGs/DLRs/UDLRs
- Shutdown Controllers
- Shutdown NSX Manager
Site-B Steps:
- Disconnect Secondary NSX Manger from Primary
- Promote the NSX Manager as Primary
- Deploy the Universal NSX Controllers in Site-B
- Deploy UDLR Control VMs
- Verify “Global Configuration” on the UDLR
- Verify and amend “Dynamic Routing” configuration for the UDLR control VM(s)
- Amend any dynamic routing configuration on ESGs, as necessary
- Optional: If “Site-B” will be the “Primary” for some forceable future, update the syslog, NTP and DNS IPs for the NSX components
- If deployed, enable any “OneArm” Load Balancer ESG(s) network connectivity in Site-B.
We have successfully promoted “Site-B” as “Primary” and restored the North/South connectivity via “Site-B” ESGs.
Objective: Now, when the “Site-A” comes back online and you will now have “two” NSX Managers with “Primary” role assigned. The goal of this blog is to demote the “Site-A” NSX-V Manager to secondary to avoid any conflicts.
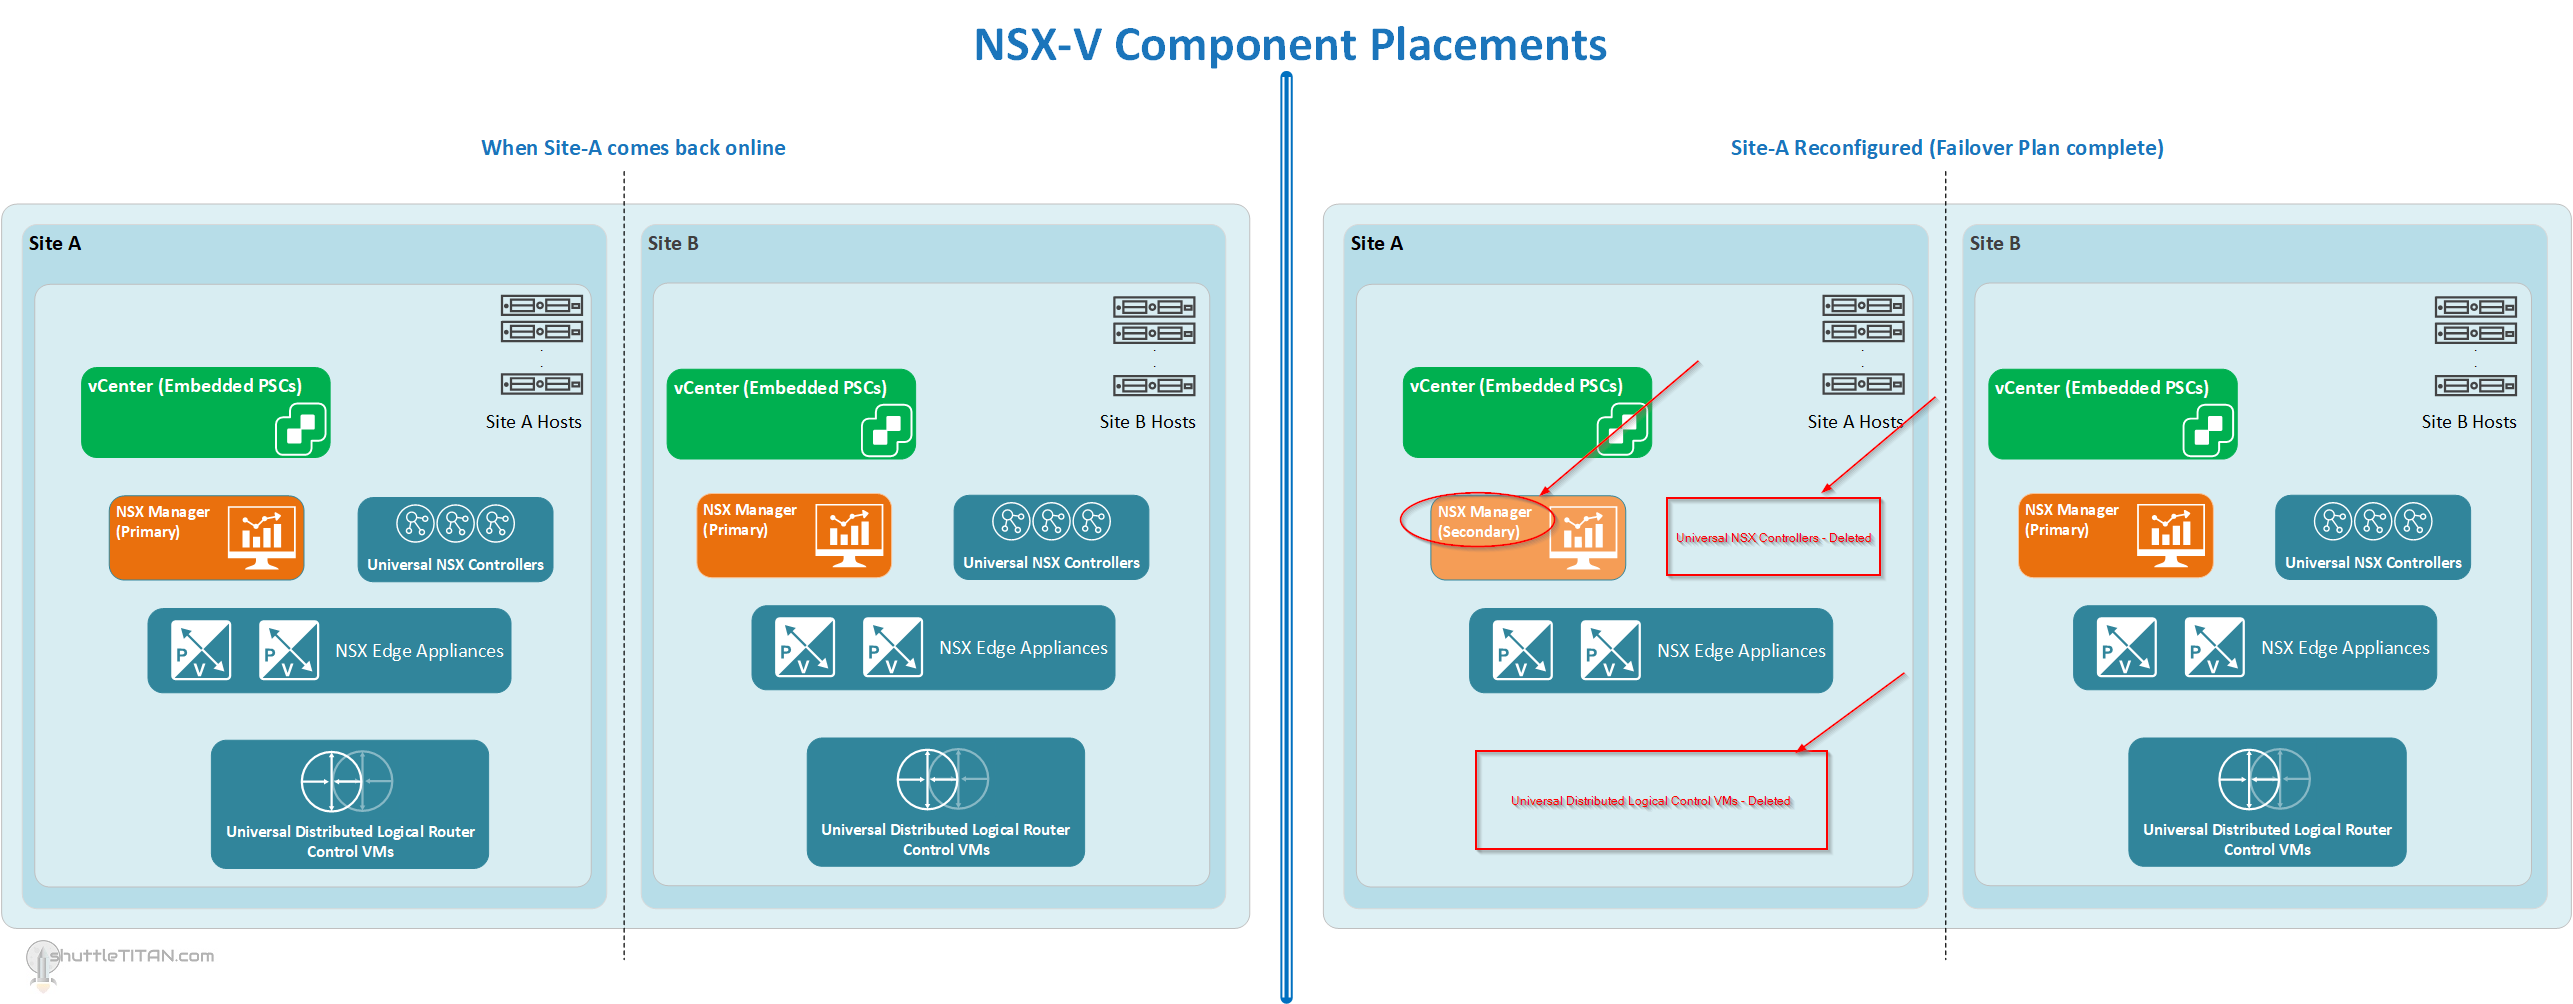
Below are the diagrams to visualize the placement of the NSX-V components and OneArm Load Balancer, after following the steps in “Part 3” of this Failover Plan:
Location of NSX-V Components, and when Site-A comes back online and after reconfiguration (Click on the Image to enlarge it):
OneArm Load Balancer (If Deployed), and when Site-A comes back online and after reconfiguration (Click on the Image to enlarge it):

Site-A:
- Power on, all ESGs/DLRs/UDLRs
- Power on, Controllers
- Power on, NSX Manager
- Force remove Secondary NSX Manager from “Site-A”:
- Go to “Network and Security” Plugin in the vSphere Client
- Installation and Upgrade -> Management -> NSX Managers
- Both NSX Managers will now have “Primary” role
- Select the “Site-A” NSX Manager, click actions -> “Remove Secondary NSX Manager”
- Click “Perform operation even if the NSX Manager is inaccessible” and click “OK”.
- Demote the “Site-A” NSX Manager from “Primary” to “Secondary”:
- Select the “Site-A” NSX Manager, click actions -> “Remove Primary Role”
- Click “Yes” to confirm
- Delete “Site-A” NSX Controllers:
- Select “Site-A” NSX Controller 1 and click Delete
- Repeat the step for the remaining two “Site-A” NSX controllers
- Click “Forcefully Delete” and “Check here to acknowledge the warning” option when you delete the last controller
- Delete “Site-A” UDLR:
- Go to “Network and Security” Plugin in the vSphere Client -> NSX Edges
- Select “Site-A” NSX Manager’s IP address from the drop-down menu
- Click the respective UDLR and click Delete
- Click “Yes” in the confirmation box
Note: Follow the same steps above for each UDLR Instance as necessary
Site-B:
- Assign “Site-A” NSX Manager “Secondary” role:
- Go to “Network and Security” Plugin in the vSphere Client
- Installation and Upgrade -> Management -> NSX Managers
- Select the “Site-B” NSX Manager (one with Primary)
- Click actions -> “Add Secondary NSX Manager”
- Specify the “IP”, “admin” and the passwords as requested.
- Trust the certificate and click “Yes” to proceed.
- Assign “Site-A” NSX Manager “Secondary” role:
Site-A:
- Amend any dynamic routing configuration on Site-A ESGs for the associated UDLR, as necessary:
- If configured, amend filters as necessary to permit or deny network routes to physical switch neighbors
- Check BGP Neighbors status is Established, UP
- Verify routes are being exchanged (both Physical routes and UDLR routes respectively)
- If deployed, disable any “OneArm” Load Balancer ESG(s) network connectivity (disable interface)
- Amend any dynamic routing configuration on Site-A ESGs for the associated UDLR, as necessary:
Site-B:
- Verify dynamic routing configuration on the UDLR for the “Site-A” ESGs:
- Open the console of the UDLR VM and login with “admin” credentials
- Verify BGP neighbors status is “Established” and “UP” for both “Site-A” and “Site-B” ESG IPs, by running the following command:
show ip bgp neighbors
- Verify the routes (or “Default” route) are being received, as appropriate:
- Verify dynamic routing configuration on the UDLR for the “Site-A” ESGs:
show ip route
This completes the configuration steps when “Site-A” comes back online and also completes the “Failover Plan” from “Site-A” to “Site-B”.
Failback Plan:
Now that “Site-B” is running as Primary and “Site-A“ as secondary for NSX-V components, the “Failback” to “Site-A” is no different to this “Failover Plan”. The steps will be exactly the same but considering “Site-B” as primary.