With NSX-T gaining traction this year, NSX-V is still widely used by many organisations. The question of “NSX-V site failover plan” came up twice in the last week, which encouraged me to write this blog. In fact – I have this discussion with almost every customer and strongly advise to test drive the failover and failback of all NSX-V components at least once, before going Live with the environment.
This blog is about the steps involved in a “Planned” or “Unplanned” failover of NSX-V components i.e. NSX Manager, controllers, universal distributed logical routers in an Active/Passive datacentre scenario i.e. all North/South routing flow via one site’s ESG(s).
If you are here reading this blog, it is assumed that you have enough exposure and experience in deploying NSX-V to understand the configuration and the reasoning being the failover.
Objective: In this failover plan, “Site-A” is referred to as “Primary” and “Site-B” as “Secondary”. The end goal of this failover plan is to make “Site-B” Primary and “Site-A” Secondary (when it recovers) in a Cross-vCenter NSX Design.
I have decided to split this topic into three parts for easier interpretation:
- Part 1 (this blog), talks about:
- Use Cases
- Assumptions
- Current state and Target State i.e. before and after failover
- Pre-requisites
- Summary of the Failover Plan
- Part 2 (here), talks about the failover configuration steps to make Site-B “Primary”
- Part 3 (here), talks about the configuration steps required after Site-A comes back online to avoid conflicts.
- Part 1 (this blog), talks about:
Use Cases:
- “Site-A” (Primary Site) is non-functional
- Planned failover from “Site-A” (Primary) to “Site-B” (Secondary)
Assumptions:
- Two sites with dedicated vCenters and NSX-V Manager respectively.
- Cross-vCenter Design i.e. Site-A NSX-V Manager having “Primary” and Site-B as “Secondary” roles respectively.
- “Universal Distributed Logical Routers” deployed.
- Both sites have separate dedicated ESGs configured for North/South routing for each UDLR.
- “Site-A” ESGs are the preferred way out North/South traffic flow, irrespective of the VMs being located on either site, attached to the associated UDLR.
- BGP protocol being used for dynamic routing between ESGs and UDLRs.
- OneArm Load Balancer in use.
Note: If you have a multi-tenant environment i.e. multiple UDLRs and each UDLR having their respective ESG(s), you could consider the 1 UDLR and 2 associated ESGs (used in this failover plan) as “One Tenant” and follow the steps for per Tenant respectively.
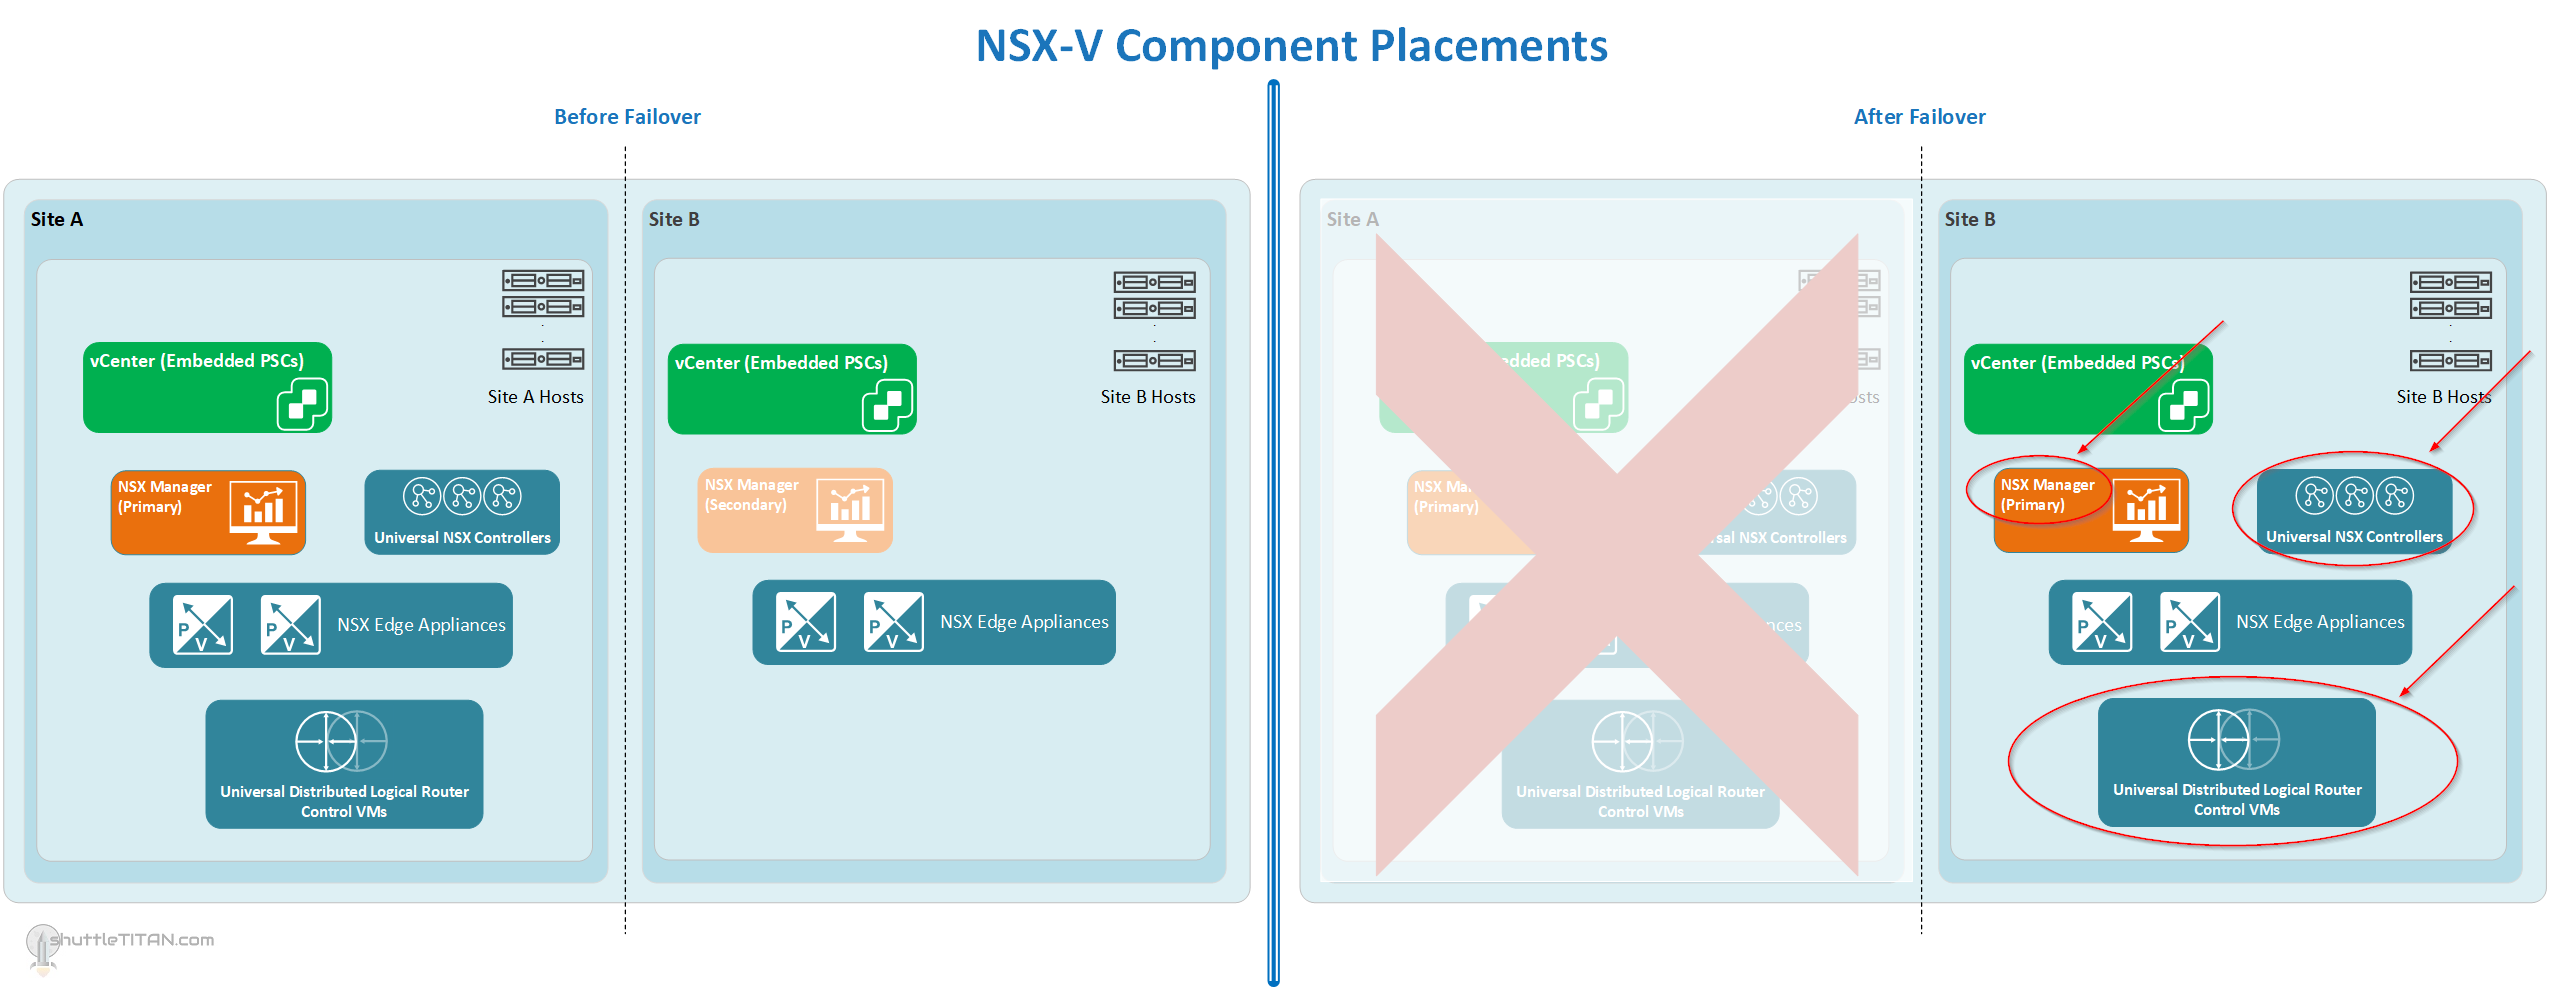
Below are the diagrams to visualize the placement of the NSX-V components and routing “before” and “after” failover:
Location of the NSX-V components, before and after failover (Click on the Image to enlarge it):
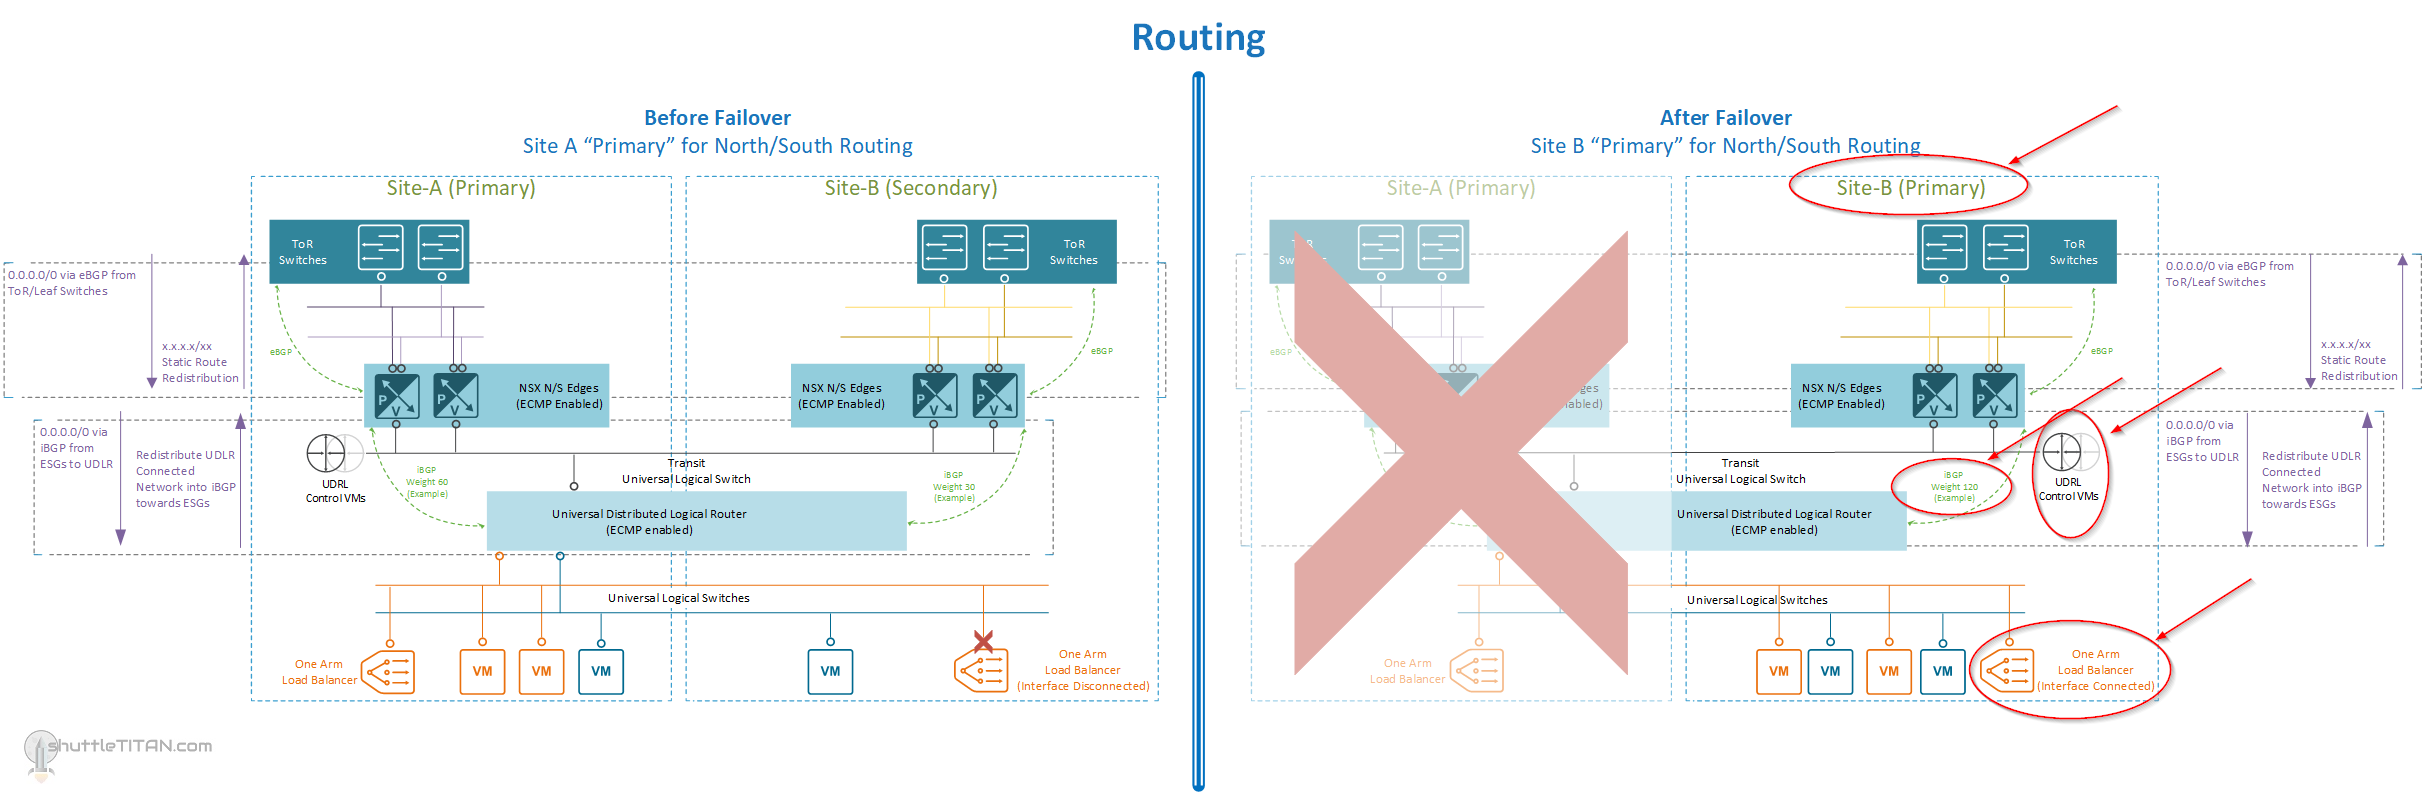
North/South routing of the NSX-V components, before and after failover (Click on the Image to enlarge it):
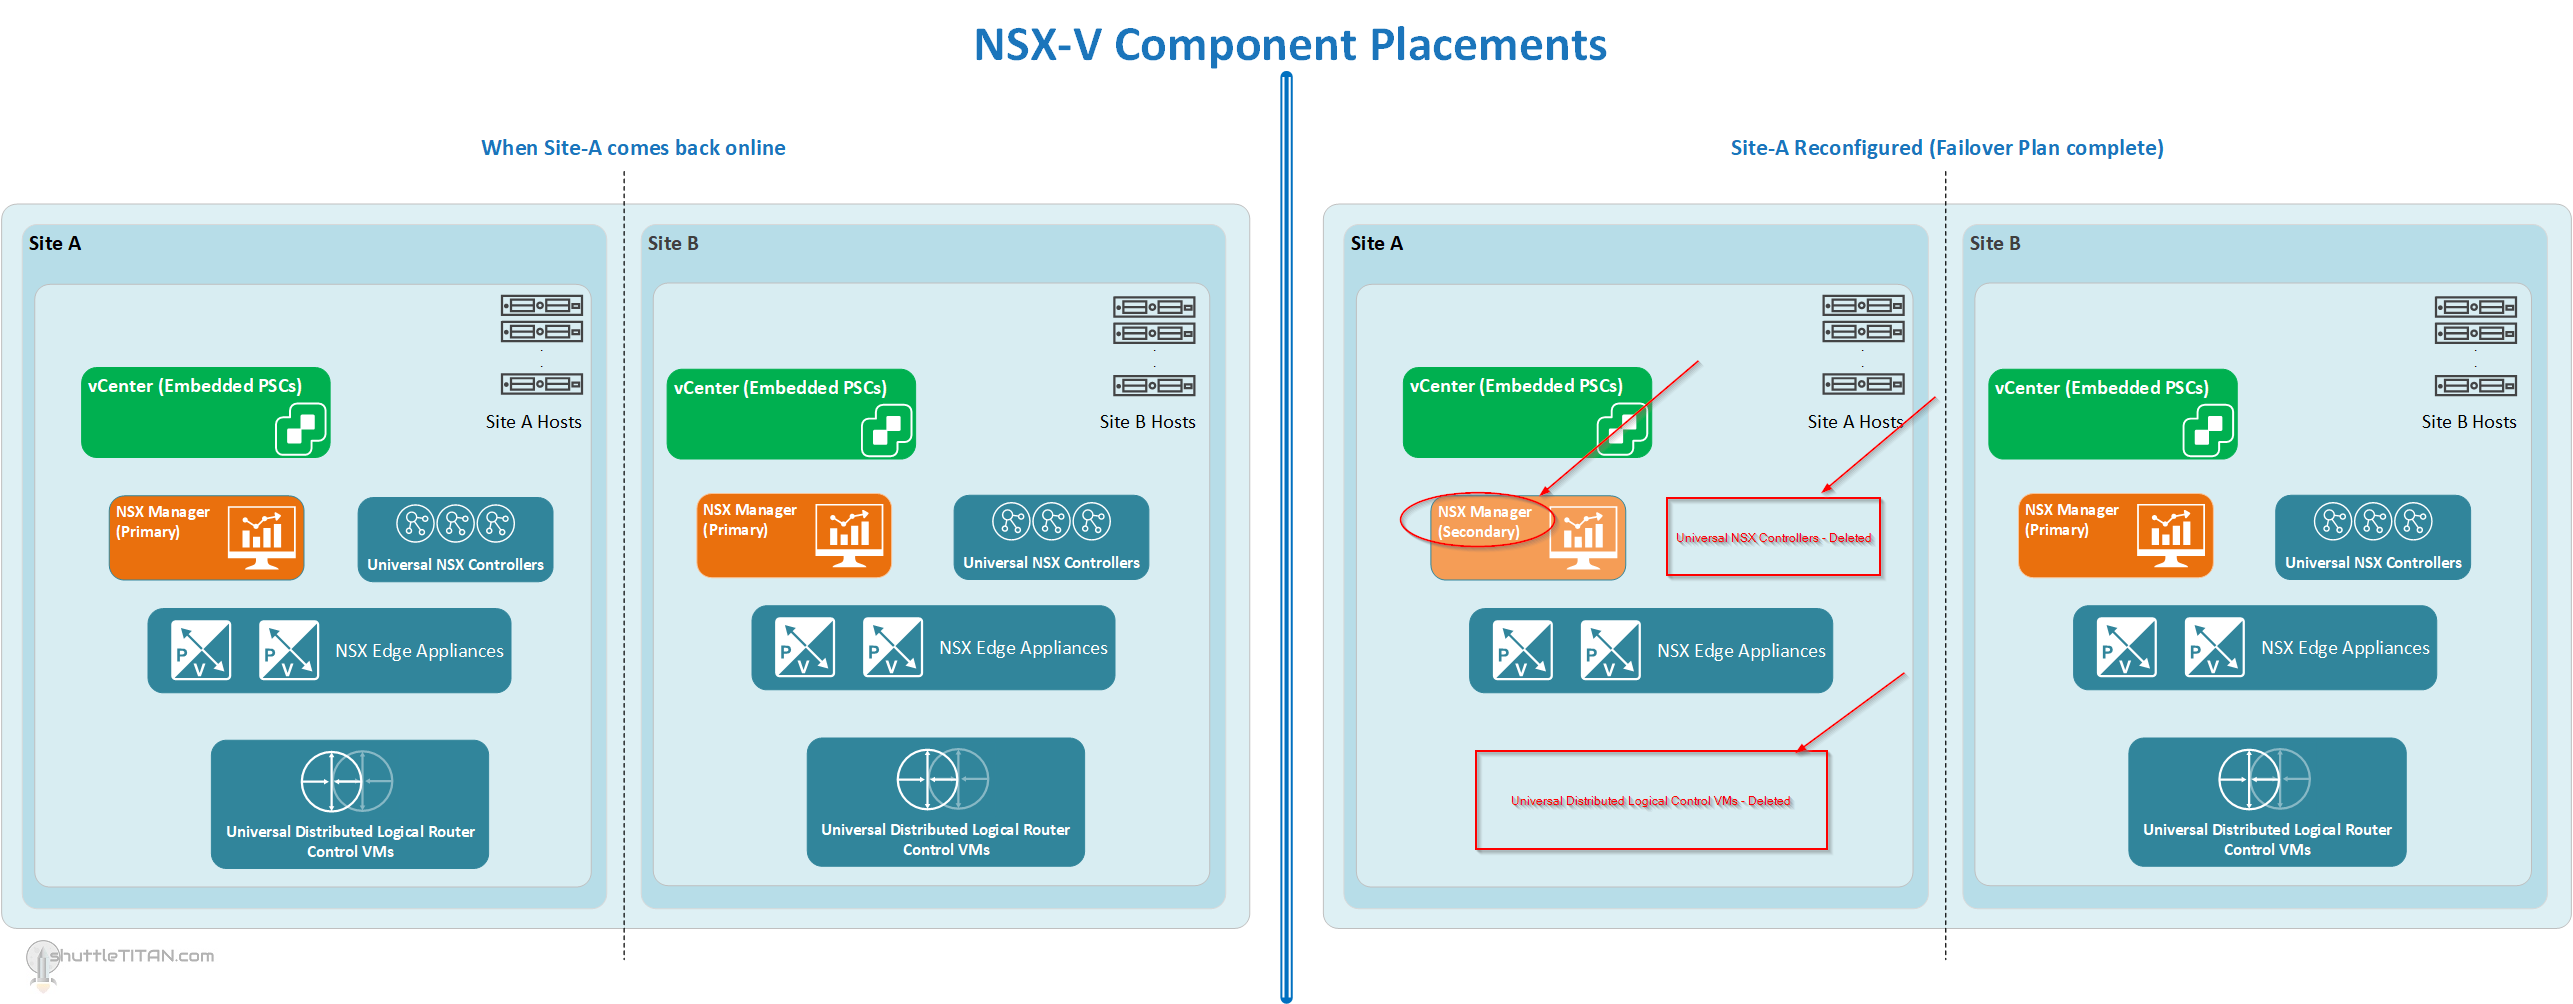
Location of NSX-V Components, and when Site-A comes back online and after reconfiguration (Click on the Image to enlarge it):
OneArm Load Balancer (If Deployed), and when Site-A comes back online and after reconfiguration (Click on the Image to enlarge it):

Pre-requisites:
- vDS Portgroup configured and available for connecting the secondary NSX Controllers.
- Setup “IP Pool” for the NSX Controllers on the secondary site with required ports open (if there is a firewall between the controllers and ESXi).
- UDLR configuration document i.e. Interfaces, ECMP staus, BGP AS, BGP neighbors (Site-A and Site-B), weights, etc.
- Admin credentials for all ESGs/UDLRs and NSX Managers (both sites).
- vCenter login credentials – the “user” having appropriate access to inventory and objects and “Enterprise Admin“ role NSX Manager plugin)
Failover Plan (Summary):
Site-A: (Only in case of a planned Failover):
- Shutdown all ESGs/DLRs/UDLRs
- Shutdown Controllers
- Shutdown NSX Manager
Site-B:
- Disconnect Secondary NSX Manger from Primary
- Promote the NSX Manager as Primary
- Deploy the Universal NSX Controllers in Site-B
- Deploy UDLR Control VMs
- Verify “Global Configuration” on the UDLR
- Verify and amend “Dynamic Routing” configuration for the UDLR control VM(s)
- Amend any dynamic routing configuration on ESGs, as necessary
- Optional: If “Site-B” will be the “Primary” for some forceable future, update the syslog, NTP and DNS IPs for the NSX components
- If deployed, enable any “OneArm” Load Balancer ESG(s) network connectivity in Site-B
Steps from here on, needs to be followed when Site-A comes back online:
Site-A:
- Power on, all ESGs/DLRs/UDLRs
- Power on, Controllers
- Power on, NSX Manager
- Force remove Secondary NSX Manager from “Site-A”
- Demote the “Site-A” NSX Manager from “Primary” to “Secondary”
- Delete “Site-A” NSX Controllers
- Delete “Site-A” UDLR
Site-B:
- Assign “Site-A” NSX Manager “Secondary” role
Site-A:
- Amend any dynamic routing configuration on Site-A ESGs for the associated UDLR, as necessary
- If configured, disable any “OneArm” Load Balancer ESG(s) network connectivity (disable interface)
Site-B:
- Verify dynamic routing configuration on the UDLR for the “Site-A” ESGs
This completes Part 1 of the NSX-V Site Failover/Failback Plan, let’s look at the failover configurations (step-by-step), to make Site-B “Primary” in NSX-V Site Failover/Failback Plan: Part 2.